
Need help with your Django project?
Check our django services
⚠️ Heads up ⚠️ This article is now outdated.
We've written a new version of this article, that you can find here - Adding Google login to your existing Django and Django Rest Framework applications
This article is a follow-up from this one. Here we will migrate the OAuth2 flow from the client to the server.
TL;DR
In this article, we'll show you an implementation of the server-side Google OAuth2 flow.
All of the code examples and the full implementation from this article are placed in this GitHub repository. It's deployed here so you can give it a try before diving into the blog post.
If you've found this useful, don't forget to give us a ⭐.
Recap
We've encountered various limitations when we used the client-side OAuth2 flow. We were not able to access the more "sensitive" Google APIs and fetch more protected information for the user. This is expected because Google requires us to perform this in a secure way. The only secure way to do this is by taking the server-side route.
You can read our previous blog post for more info.
Overview
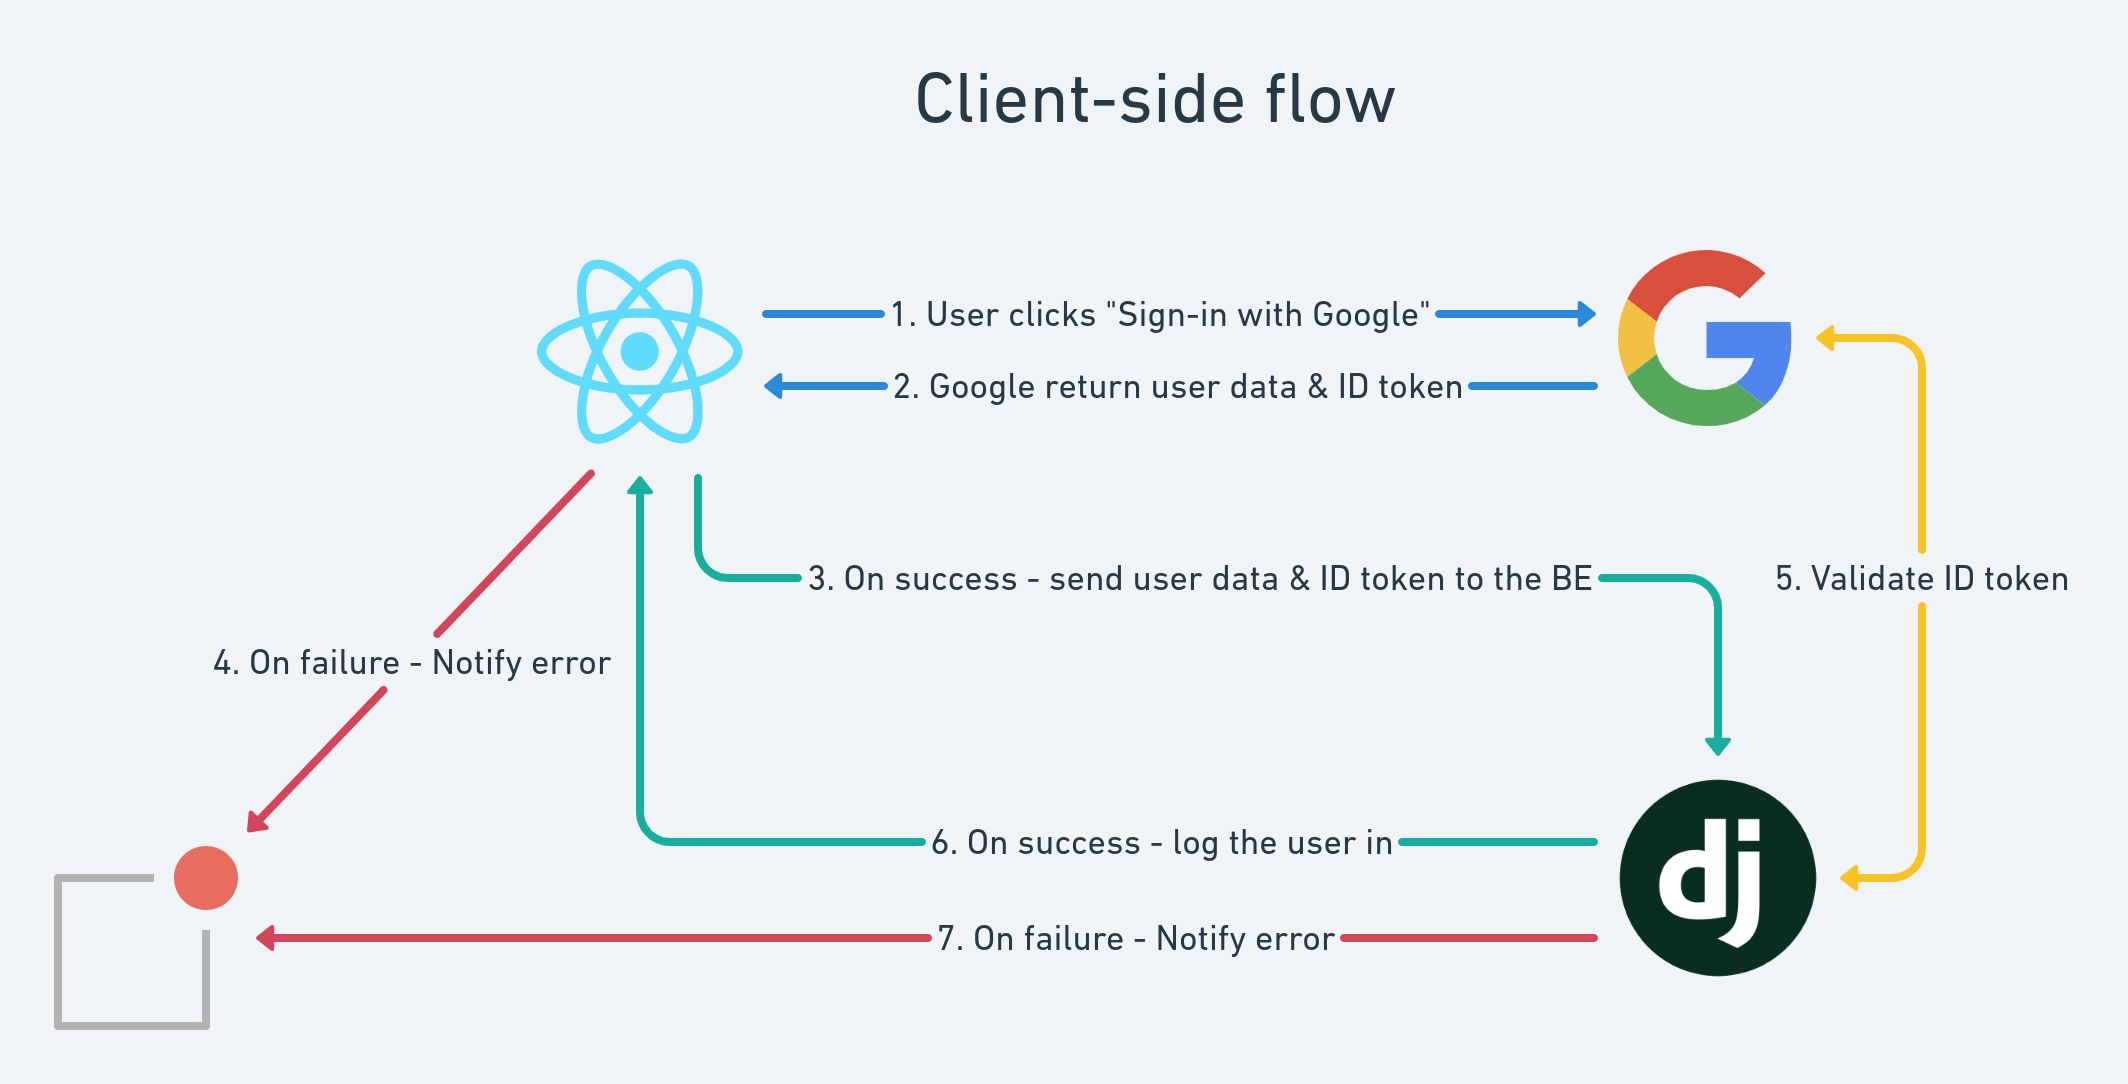
Here is a simple diagram that shows the current implementation that we have (client-side flow):
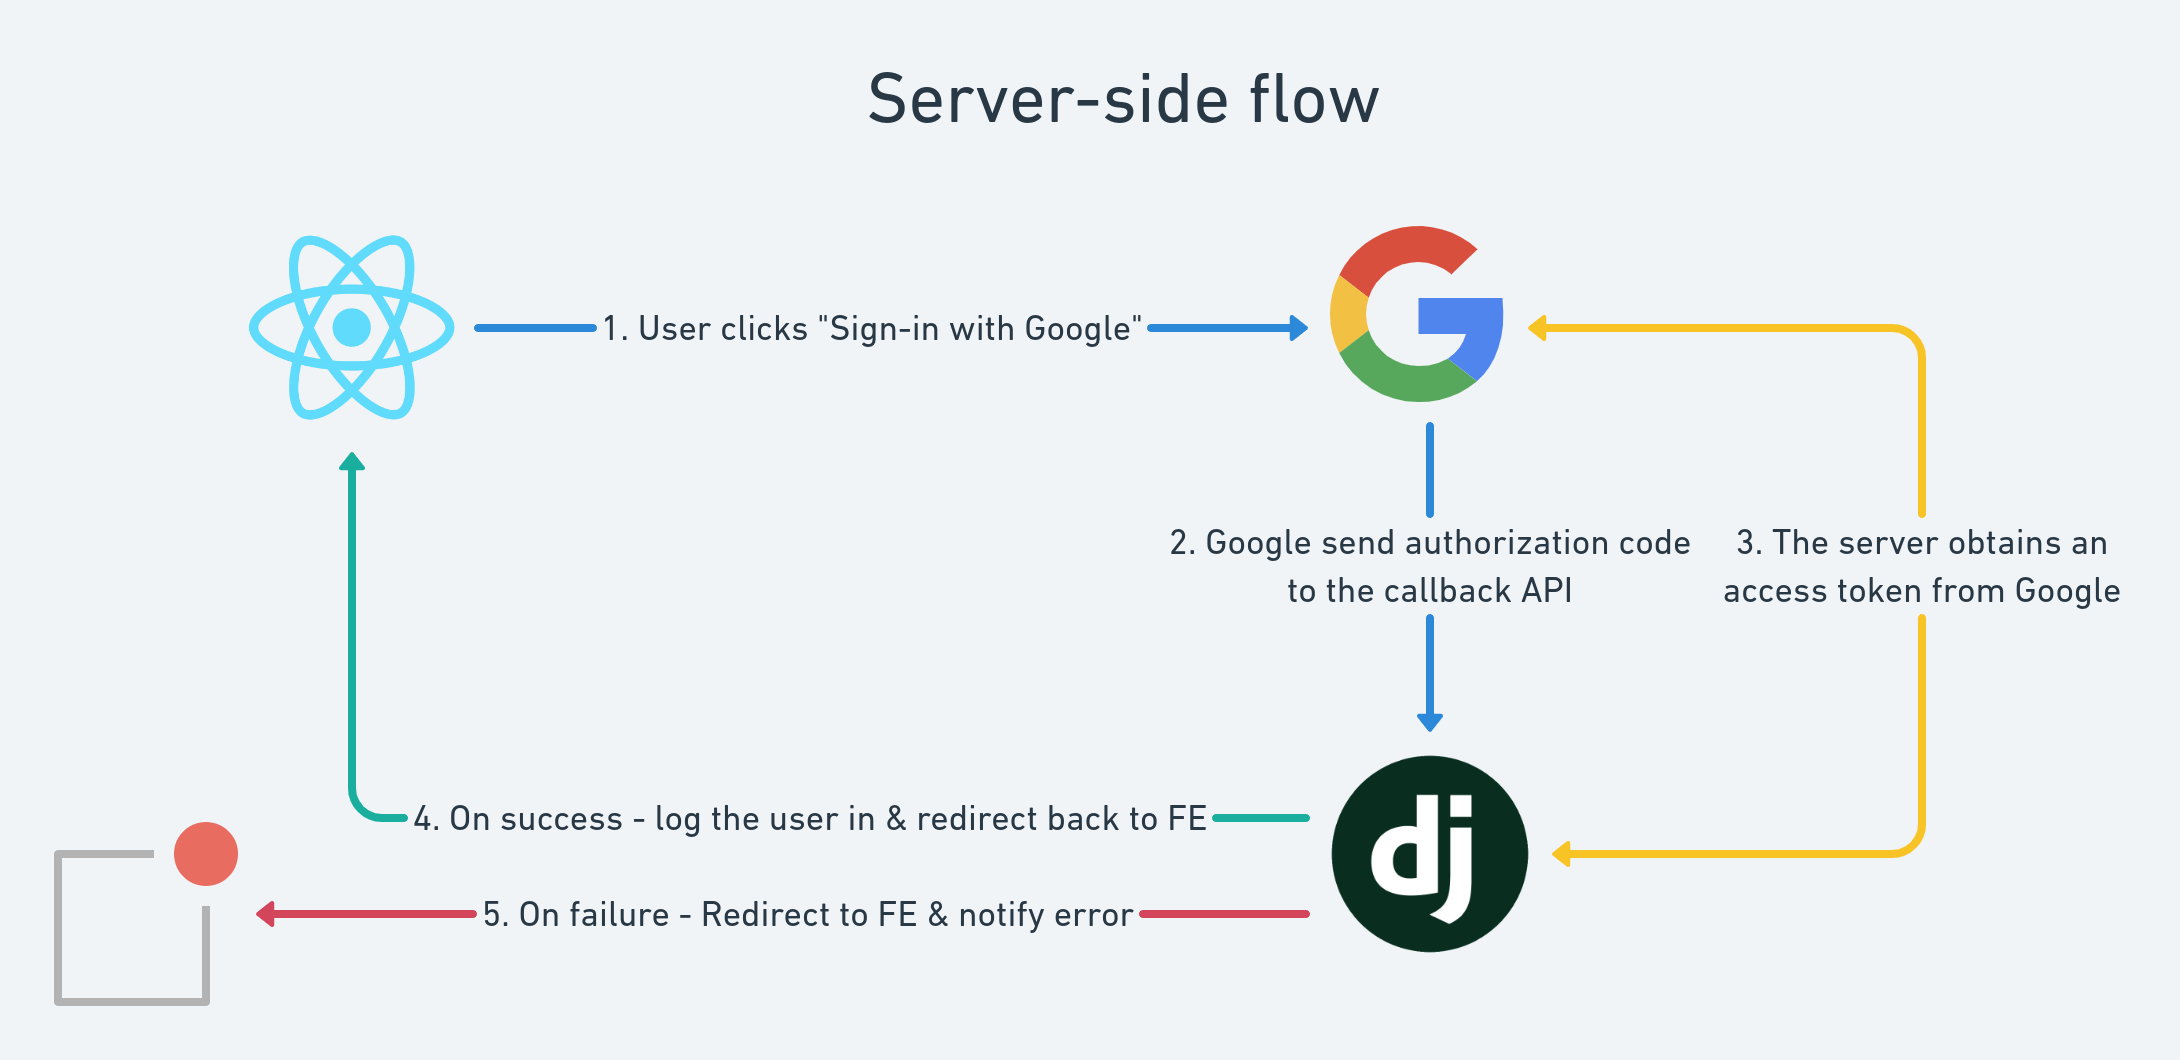
Our goal is to transform it into this (server-side flow):
Before we start: OAuth2 & Django
Logging users in using OAuth2 is a common thing for most websites nowadays. We cannot think of a platform that we've used recently where we couldn't log in using a Google account. That's why we decided to use the Google OAuth2 provider for our examples.
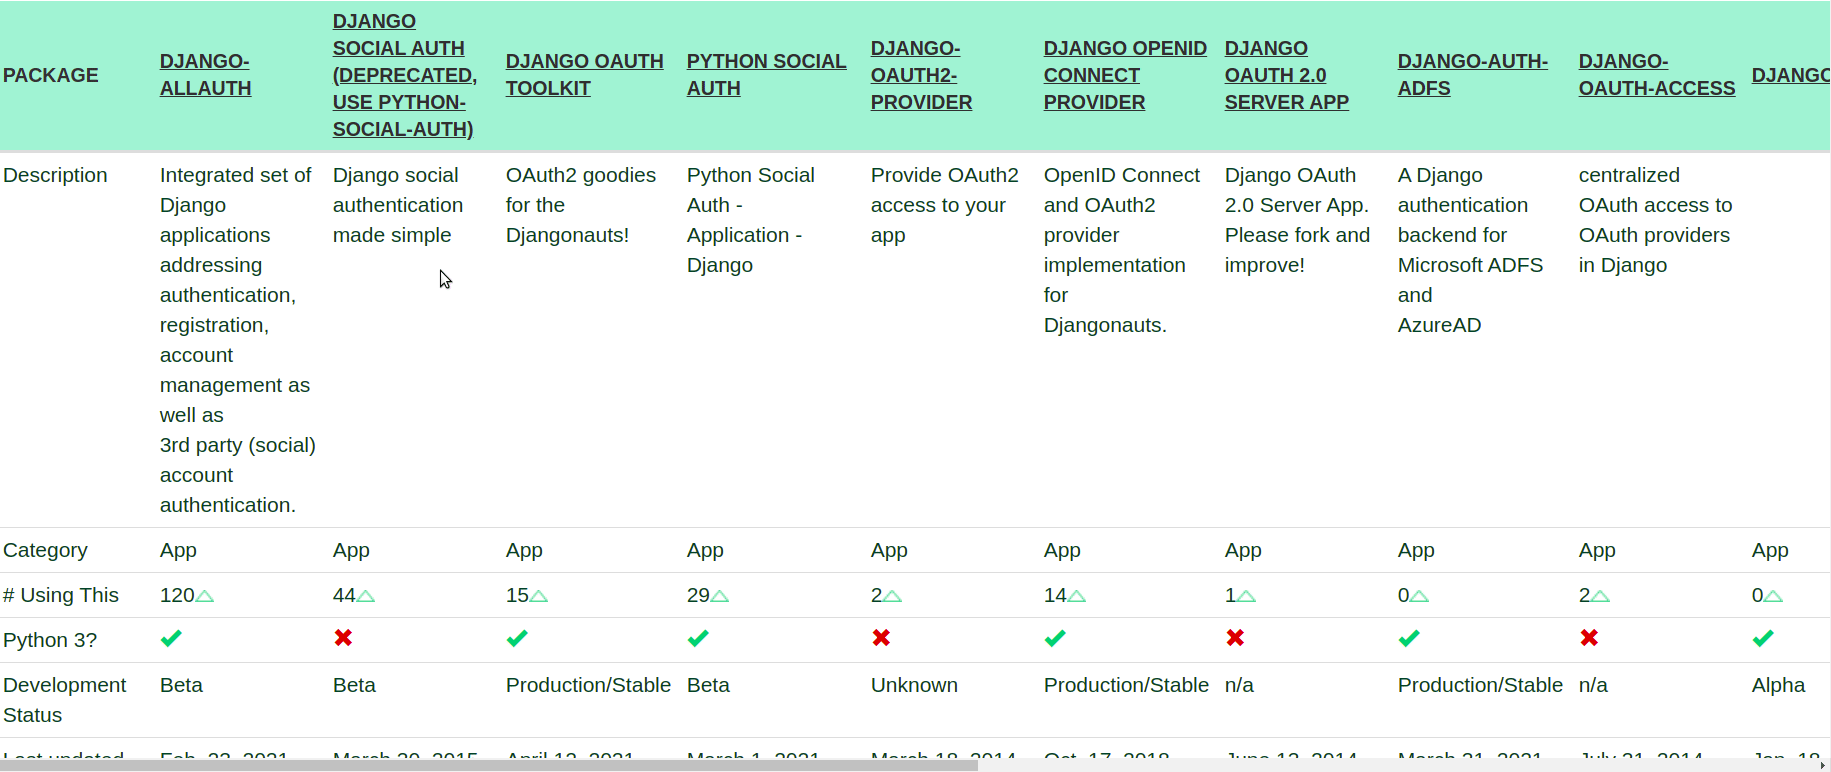
We said that the situation is a little bit messy right now and here is why. If you check the official Django packages for OAuth2 (and this doesn't even include the DRF ones), you'll find out that there are a lot of packages from which you can choose from:
This is the main reason we've decided to implement the OAuth2 flow on our own. Here are the key points:
- It's almost impossible to find what you're searching for in the search engines because the names of the packages are really close. We were in a situation where we copied an initial configuration of a package that we hadn't actually installed. We don't want to waste time in such situations anymore.
- Most of the implementations are tightly connected to Django's Views and Middlewares. We don't need any of this since we're only using DRF API Views.
- We want to have an OAuth2 flow on our front-end only. We don't need it in the admin views for example.
- In the real-life example, we had certain requirements that added some business logic on top of the OAuth2 flow. It was really hard to make any of the above packages fit our needs properly. We didn't add this to the example to have it more simple.
- The implementations are usually over-engineered to cover all possible providers (e.g. Google, Facebook, LinkedIn, etc).
We believe that you won't use more than 2 or 3 OAuth2 providers in your app. It's relatively easy to build this infrastructure on your own as we'll show you in the examples below. Consider doing this instead of spending your time debugging why your third-party log-in flow is not working as expected.
Server-side OAuth2
This approach is very similar to the client-side one. The main difference is that you no longer need to use iframes. Here is what you need to do in short:
- Your front-end should redirect the user to the official Google OAuth2 page.
- When the form is submitted, Google will call your backend via a callback API.
- If everything is OK, you should create a new login session for your user.
- Redirect your user to the desired page in the front-end.
Google Application Set-up
For this flow to work properly, you'll need to set your backend OAuth2 callback URL(s) in the Authorized redirect URIs in your Google application settings:
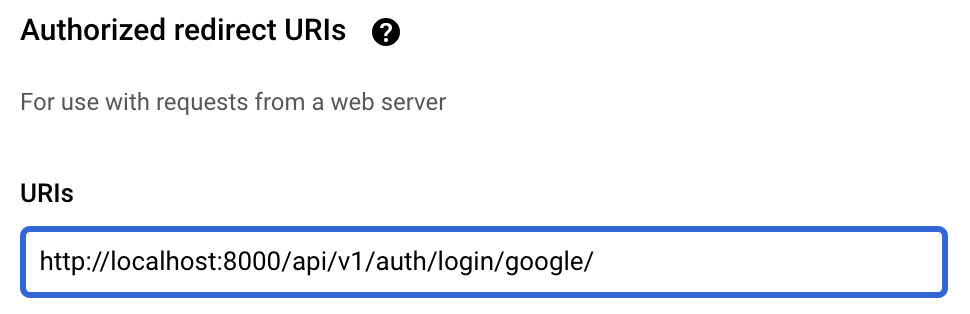
Note: For local Django development, the default server port is 8000. Change this corresponding to your specific environment. If you decide to deploy your app, you just need to add another URI and set the live app's one.Server-side flow in your React front-end
Once you're ready with your Google Application set-up, you'll have to add a "Google Login" button that redirects your users to the official Google OAuth2 page.
Note: Be careful with the styles of the button!
If you want to use Google OAuth2 in your app you must follow the Google Branding Guidelines!
If you don't want to style it on your own you can just use react-google-button as we do in this example.
Redirecting to the Google OAuth2 page
There is nothing special here - you just need to make a standard JavaScript redirect here. This is usually done by changing the location of the current window.
There are few important things that you should follow here:
- This is the place where you define the authorization parameters that you want to pass to Google while performing the OAuth2 flow. Here is a full list of them from the Google documentation.
- Set the
response_typevalue to"code"to tell Google to pass theauthorization_codeto your callback API. - Apart from the
client_id, the most important parameter here is theredirect_uri. You should add the URL of your callback API here. - The other important parameter is the
scopeone. It's used to define what data do you want to retrieve for your users. Here is a full list of the possible scopes that you can use. (Note: Google has to authorize your app for some of them!) - NOTE: You need to set the
access_typetoofflineif you need to use arefresh_token. It defaults toonlineand Google won't return you therefresh_tokenif you don't add this. - If you've messed up with any of the params, Google will show you an
Authorization Errorpage. They'll provide you with a helpful message (in most cases) as well.
Here is an example code snippet that we use for the current example. It can be found here.
const openGoogleLoginPage = useCallback(() => {
  const googleAuthUrl = 'https://accounts.google.com/o/oauth2/v2/auth';
  const redirectUri = 'api/v1/auth/login/google/';

  const scope = [
    'https://www.googleapis.com/auth/userinfo.email',
    'https://www.googleapis.com/auth/userinfo.profile'
  ].join(' ');

  const params = {
    response_type: 'code',
    client_id: REACT_APP_GOOGLE_CLIENT_ID,
    redirect_uri: `${REACT_APP_BASE_BACKEND_URL}/${redirectUri}`,
    prompt: 'select_account',
    access_type: 'offline',
    scope
  };

  const urlParams = new URLSearchParams(params).toString();

  window.location = `${googleAuthUrl}?${urlParams}`;
}, []);
Server-side flow in your DRF backend
We're ready with the front-end side of our implementation. Here is what we've achieved so far:
- We have a "Login with Google" button
- The users are redirected to the Google OAuth2 page when they press this button
Now we need to define what should happen when your users try to log in using Google. This happens in the Google Login Callback API that you should implement in your backend. As we pointed out above, the URL of this API must be:
- defined in the Authorized Redirect URIs in your Google Application. This is just a security concern that will allow Google to white-list your API.
- passed as a
redirect_uriwhen you open the Google OAuth2 page. This will make Google redirect your users to this URL after they're ready.
Handling Google OAuth2 Callback
- If the Google OAuth2 was not successful, Google will call your API with an
errorGET parameter. The most common practice here is redirecting your user back to the Login page in your front-end and display this error message there. - If the Google OAuth2 was successful, Google will call your callback API with a
codeGET parameter.

- The authentication code expires in 10 minutes!
- You should use this code to retrieve the
access_tokenof your user. - Once you have the
access_tokenyou can use it to retrieve the data that you need for this user. - NOTE: Check the
scopeparameter in your front-end code if you have troubles accessing the desired user data. - The most common practice here is to use the
emailof the authorized user in order to match it to a user from your system. This means that your users must have a unique email in your database! - Once you retrieve your user record from the database, you can create a JWT login session for it.
- The last step that you should do is to redirect the user to the desired page in your front-end.
Here is our implementation of the above steps.
from urllib.parse import urlencode

from rest_framework import status, serializers
from rest_framework.views import APIView
from rest_framework.response import Response

from django.urls import reverse
from django.conf import settings
from django.shortcuts import redirect

from api.mixins import ApiErrorsMixin, PublicApiMixin

from users.services import user_get_or_create

from auth.services import jwt_login, google_get_access_token, google_get_user_info


class GoogleLoginApi(PublicApiMixin, ApiErrorsMixin, APIView):
    class InputSerializer(serializers.Serializer):
        code = serializers.CharField(required=False)
        error = serializers.CharField(required=False)

    def get(self, request, *args, **kwargs):
        input_serializer = self.InputSerializer(data=request.GET)
        input_serializer.is_valid(raise_exception=True)

        validated_data = input_serializer.validated_data

        code = validated_data.get('code')
        error = validated_data.get('error')

        login_url = f'{settings.BASE_FRONTEND_URL}/login'

        if error or not code:
            params = urlencode({'error': error})
            return redirect(f'{login_url}?{params}')

        domain = settings.BASE_BACKEND_URL
        api_uri = reverse('api:v1:auth:login-with-google')
        redirect_uri = f'{domain}{api_uri}'

        access_token = google_get_access_token(code=code, redirect_uri=redirect_uri)

        user_data = google_get_user_info(access_token=access_token)

        profile_data = {
            'email': user_data['email'],
            'first_name': user_data.get('givenName', ''),
            'last_name': user_data.get('familyName', ''),
        }

        # We use get-or-create logic here for the sake of the example.
        # We don't have a sign-up flow.
        user, _ = user_get_or_create(**profile_data)

        response = redirect(settings.BASE_FRONTEND_URL)
        response = jwt_login(response=response, user=user)

return responseObtaining the access token
To get the access_token of your users, you need to do a POST request to Google using the authentication code from the callback API.
def google_get_access_token(*, code: str, redirect_uri: str) -> str:
    # Reference: https://developers.google.com/identity/protocols/oauth2/web-server#obtainingaccesstokens
    data = {
        'code': code,
        'client_id': settings.GOOGLE_OAUTH2_CLIENT_ID,
        'client_secret': settings.GOOGLE_OAUTH2_CLIENT_SECRET,
        'redirect_uri': redirect_uri,
        'grant_type': 'authorization_code'
    }

    response = requests.post(GOOGLE_ACCESS_TOKEN_OBTAIN_URL, data=data)

    if not response.ok:
        raise ValidationError('Failed to obtain access token from Google.')

    access_token = response.json()['access_token']
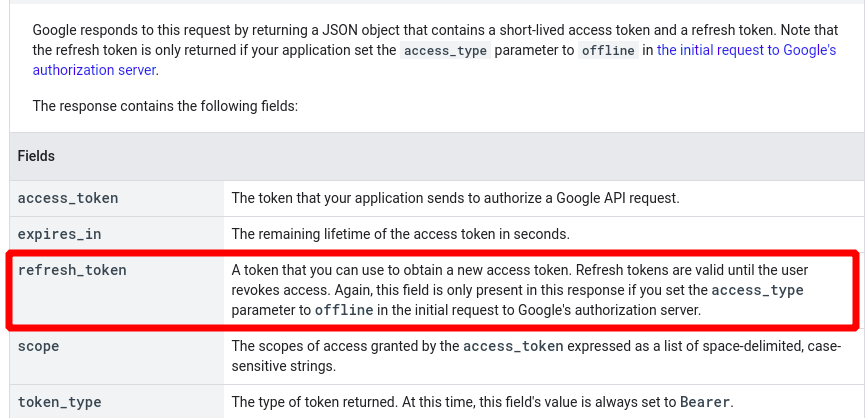
return access_tokenApart from the access_token, you can also find a refresh_token and expires_in in the payload here. You can calculate the expiry date of the access_token using the expires_in value (the token expires after expires_in seconds). You can use the refresh_token to "reborn" your access_token when it expires.
We won't go into details about the refreshing of the access tokens but you can read more on the theme in the Google docs.
Here is an example payload that you can use for a reference:
{'access_token': 'ya29.a0AfH6SMC6EcF7IfOEDFm2vBh54vvjk1Rmhp9WIT3tcmItN2hIYhVb4iAhK0OhqFi8urGVQAJMYCL3sb9lRC6wUOqubGwxTVACub3aejXm8ndtneTIR7Hp0BDaGBvY8YjkcMLc3CvLyosOZtnOc9rRdRxAwdsB',
 'expires_in': 3599,
 'id_token': 'eyJhbGciOiJSUzI1NiIsImtpZCI6Ijc3MjA5MTA0Y2NkODkwYTVhZWRkNjczM2UwMjUyZjU0ZTg4MmYxM2MiLCJ0eXAiOiJKV1QifQ.eyJpc3MiOiJodHRwczovL2FjY291bnRzLmdvb2dsZS5jb20iLCJhenAiOiI3MzkxMzE1MDc3NTgtaGhwYWg3am1sZDVnNWNyOWYya3QwbmVvbjJsamppcm4uYXBwcy5nb29nbGV1c2VyY29udGVudC5jb20iLCJhdWQiOiI3MzkxMzE1MDc3NTgtaGhwYWg3am1sZDVnNWNyOWYya3QwbmVvbjJsamppcm4uYXBwcy5nb29nbGV1c2VyY29udGVudC5jb20iLCJzdWIiOiIxMDE4MDQ3ODM2MTU4ODc3MTI3NTQiLCJlbWFpbCI6Im1hcnRpbmFuZ2Vsb3YwNTZAZ21haWwuY29tIiwiZW1haWxfdmVyaWZpZWQiOnRydWUsImF0X2hhc2giOiJWZTZxeUhCSUZNR2o3cWtpZ0xTSUt3IiwibmFtZSI6Ik1hcnRpbiBBbmdlbG92IiwicGljdHVyZSI6Imh0dHBzOi8vbGgzLmdvb2dsZXVzZXJjb250ZW50LmNvbS9hLS9BT2gxNEdoUkZ4RUdRMGlCY0FYWkRwR2QwN3pOaUdVYm0ySEdVNVBfcS05bz1zOTYtYyIsImdpdmVuX25hbWUiOiJNYXJ0aW4iLCJmYW1pbHlfbmFtZSI6IkFuZ2Vsb3YiLCJsb2NhbGUiOiJiZyIsImlhdCI6MTYyMDExNjcwMSwiZXhwIjoxNjIwMTIwMzAxfQ.LgcPS5n6wS9foS4DRE7srljaTGxfgXZONKcyu3UxsyHpdAKF5jOgNKBwy3wf-uKmmBq_5T3o9E8jsEMLvASym7fklkrUYlAoGT4MA0qags4CzqqeNSDDRQVWwJw3AjndO9XG8M8hcQQBfWnggbVX_4eevbvFKVlzX5vDFNC3qbJA9iiKbc8eH9b0dLA2GclXKIjxtAI3nyUVezU6DqS9wNWk8zkHIJf5x-jr_kzm8aHXH6XHplZab54YuGRsOzskrpFAPiSaj5VSSDldoHpXn4Sx81bDtGhTr6FwFT-2-PGQPTfe73j0sB03BVWjdR8O0NQwFK6PhpLab6A-mACMyA',
 'refresh_token': '1//09DuNCsBljo9uCgYIARAAGAkSNwF-L9Irh2Yh4vlt-WOHqBRxY0IY60NAmbVOoYwWCwgIgSU-ShwFVicYtlVbOr9J8WLEGDna00o',
 'scope': 'https://www.googleapis.com/auth/userinfo.email openid '
          'https://www.googleapis.com/auth/userinfo.profile',
 'token_type': 'Bearer'}
NOTE: The refresh_token won't be present in the payload if you didn't set the access_type to offline in the initial phase!
That's all folks! You now have a fully working server-side Google OAuth2 flow in your app! 🎉
Upsides
Once you've retrieved a valid access token for the user, you can store it in your database & access Google APIs on behalf of the user even when he/she is not present in your application. This is the main downside of the client-side approach.
This can be accomplished only if you have a secure way of storing your users' information. Luckily, with the server-side implementation - you can do that.
From the Google docs:
This OAuth 2.0 flow is specifically for user authorization. It is designed for applications that can store confidential information and maintain state. A properly authorized web server application can access an API while the user interacts with the application or after the user has left the application.
Summary
The OAuth2 flow is one of the most used ways of user log-in in nowadays. It's an essential part of almost all client-facing web apps.
These articles aim to help you through the OAuth2 integration by providing you an end-to-end implementation of both the client-side & server-side flows. We hope this was valuable for you ❤️!
You can find the full implementation here.
Check our blog for more useful articles 🤠.