
Need help with your Django project?
Check our django servicesAdding Google login to your existing Django and Django Rest Framework applications

tl;dr
You can find the code from this article in our Django Styleguide Example repository.
Introduction
This article is a follow-up from our previous Google OAuth2 & Django articles here:
- https://www.hacksoft.io/blog/google-oauth2-with-django-react-part-1
- https://www.hacksoft.io/blog/google-oauth2-with-django-react-part-2
Since those articles were starting to age and we want to preserve them as is, instead of completely rewriting them, we are creating a set of new ones, showcasing the latest approach of adding Google Login to your Django project.
Before we start
We presume that you have an existing Django application (no matter if it's API based or View based) with existing user authentication.
What we want to achieve is the following:
Add "Login with Google" functionality to our existing application, without using any of the big 3rd party dependencies (like django-allauth for example).
We will show 2 main ways of doing that:
- Without relying on any additional dependencies - following the OAuth2 standard for doing a Google login. We call this the
raw flow. - By using the official Google API client library for Python. We call this the
sdk flow.
A few words about Google login
Google login is effectively an OAuth2 implementation.
And once we get into OAuth2 land, it's important to state that we can use the Google login for two different purposes:
- Authenticate a given user with an existing Google account.
- Gain access to Google's APIs, via that authenticated Google account.
That's why, at the end of the entire Google login flow, we'll have 2 results:
- An
id_token, which represents the actual user, that has successfully authenticated. - An
access_token, which can be used to access relevant Google APIs.
In this article, our primary focus is to implement "Login with Google", meaning, we care about the id_token.
The implementation flows are following those resources:
- For the
raw flow- https://developers.google.com/identity/openid-connect/openid-connect - For the
sdk flow- https://developers.google.com/identity/protocols/oauth2/web-server
Lets get started!
Google Application Setup
Before we start implementing the two flows for our Google login, we have to configure a project in the Google API Console, in order to obtain the required credentials.
Those required credentials are: client_id, client_secret, project_id. Without those credentials, we can do nothing.
Now, the OAuth2 flow requires a callback, which is effectively a url, served by our Django app. This is called a redirect URI.
For our example, we are going to setup 2 different redirect URIs, because we are going to show 2 different flows - raw and sdk. Usually, we'll need just one.
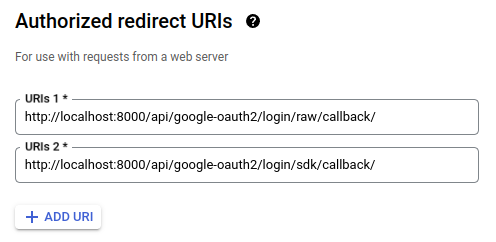
Note: For local Django development, the default server port is 8000. You may need to change this, corresponding to your local environment or production domain.Once we are ready with this, we'll have our credentials, which we are going to use in our Django app.
Of course, we recommend reading those credentials from the environment.
Here's how we do it in our example, using django-environ
from config.env import env
GOOGLE_OAUTH2_CLIENT_ID = env.str("DJANGO_GOOGLE_OAUTH2_CLIENT_ID", default="")
GOOGLE_OAUTH2_CLIENT_SECRET = env.str("DJANGO_GOOGLE_OAUTH2_CLIENT_SECRET", default="")
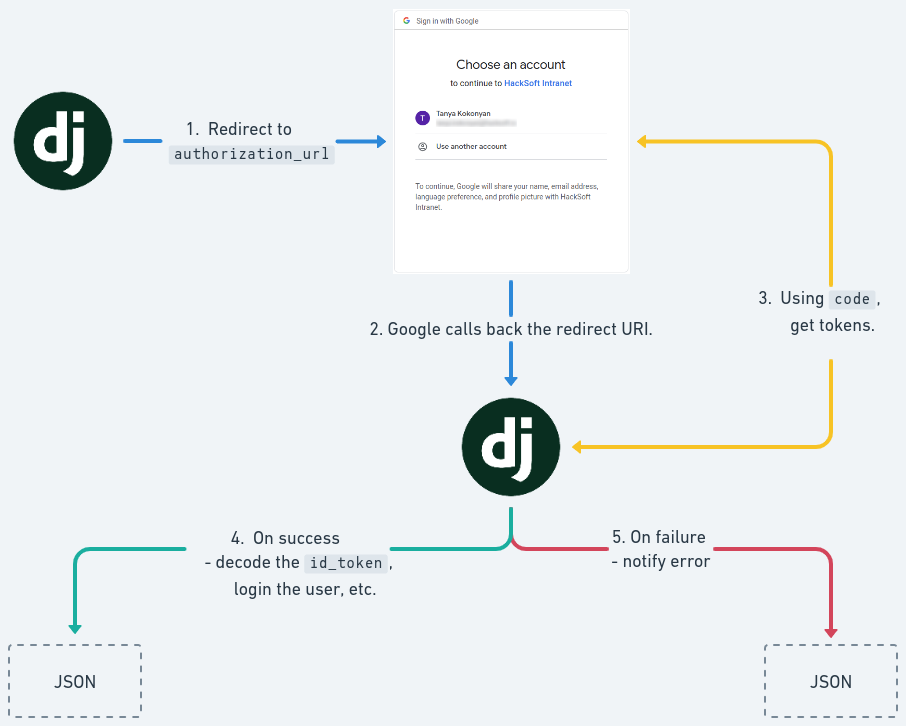
GOOGLE_OAUTH2_PROJECT_ID = env.str("DJANGO_GOOGLE_OAUTH2_PROJECT_ID", default="")A diagram of the flow
Before we get into implementation details, lets take a look at what we need to do:
Implementing the raw flow
Now, lets implement Google login without any additional dependencies.
We will follow this guide - https://developers.google.com/identity/openid-connect/openid-connect - and put it in Django context.
1. Obtain Google Login credentials
As we mentioned above, we have to obtain the values for our client_id, client_secret, project_id.
For convenience, we use a simple attrs class, called GoogleRawLoginCredentials to store those credentials.
Additionally, we have a google_raw_login_get_credentials function, that'll collect everything from Django settings and return an instance of our credentials class.
from django.conf import settings
from django.core.exceptions import ImproperlyConfigured
from attrs import define


@define
class GoogleRawLoginCredentials:
    client_id: str
    client_secret: str
    project_id: str


def google_raw_login_get_credentials() -> GoogleRawLoginCredentials:
    client_id = settings.GOOGLE_OAUTH2_CLIENT_ID
    client_secret = settings.GOOGLE_OAUTH2_CLIENT_SECRET
    project_id = settings.GOOGLE_OAUTH2_PROJECT_ID

    if not client_id:
        raise ImproperlyConfigured("GOOGLE_OAUTH2_CLIENT_ID missing in env.")

    if not client_secret:
        raise ImproperlyConfigured("GOOGLE_OAUTH2_CLIENT_SECRET missing in env.")

    if not project_id:
        raise ImproperlyConfigured("GOOGLE_OAUTH2_PROJECT_ID missing in env.")

    credentials = GoogleRawLoginCredentials(
        client_id=client_id,
        client_secret=client_secret,
        project_id=project_id
    )

    return credentials
This is a pattern that we use quite often in our projects and it works really well.
2. Start the Google login flow by redirecting to Google's login page
Now, the very first thing that we need to do is to redirect our users to Google's login page.
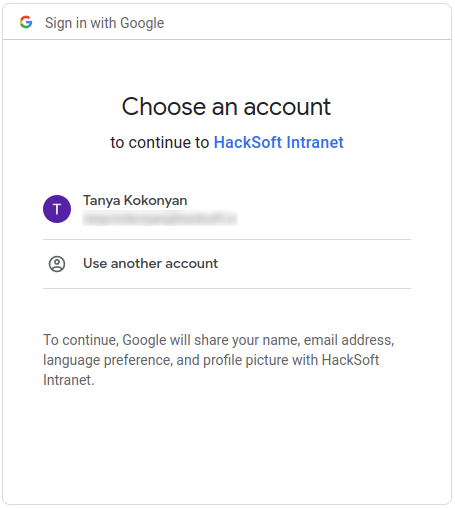
In order to get to this screen, we need to do 2 things:
- Build the actual url that we are going to be redirecting to. We'll call this
authorization_url. - Redirect there, via a Django View or Django Rest Framework API (we'll show both examples).
As an Django Rest Framework API, it's going to look like this:
from rest_framework.views import APIView
from django.shortcuts import redirect

from styleguide_example.blog_examples.google_login_server_flow.raw.service import (
    GoogleRawLoginFlowService,
)


class PublicApi(APIView):
    authentication_classes = ()
    permission_classes = ()


class GoogleLoginRedirectApi(PublicApi):
    def get(self, request, *args, **kwargs):
        google_login_flow = GoogleRawLoginFlowService()

        authorization_url, state = google_login_flow.get_authorization_url()

        request.session["google_oauth2_state"] = state

        return redirect(authorization_url)
All we need to do is to point our user to this specific API and voala, the user is going to be redirected.
Quick note - even if you want to implement this from a React SPA, you can just redirect the user to the same backend URL and start the flow!
And if we want to do this with a standard & plain Django view, it's going to look like this:
from django.views import View
from django.shortcuts import redirect

from styleguide_example.blog_examples.google_login_server_flow.raw.service import (
    GoogleRawLoginFlowService,
)


class GoogleLoginRedirectApi(View):
    def get(self, request, *args, **kwargs):
        google_login_flow = GoogleRawLoginFlowService()

        authorization_url, state = google_login_flow.get_authorization_url()

        request.session["google_oauth2_state"] = state

        return redirect(authorization_url)
As you can see, we are adding something called state to the session.
This is a mechanism to prevent cross-site request forgery attacks (CSRF). We highly recommend reading Google's explanation here.
Now, lets see the actual implementation of GoogleRawLoginFlowService.
We've highlighted the important part - get_authorization_url.
from random import SystemRandom
from urllib.parse import urlencode
from django.conf import settings
from django.urls import reverse_lazy
from oauthlib.common import UNICODE_ASCII_CHARACTER_SET


class GoogleRawLoginFlowService:
    API_URI = reverse_lazy("api:google-oauth2:login-raw:callback-raw")

    GOOGLE_AUTH_URL = "https://accounts.google.com/o/oauth2/auth"
    GOOGLE_ACCESS_TOKEN_OBTAIN_URL = "https://oauth2.googleapis.com/token"
    GOOGLE_USER_INFO_URL = "https://www.googleapis.com/oauth2/v3/userinfo"

    SCOPES = [
        "https://www.googleapis.com/auth/userinfo.email",
        "https://www.googleapis.com/auth/userinfo.profile",
        "openid",
    ]

    def __init__(self):
        self._credentials = google_raw_login_get_credentials()

    @staticmethod
    def _generate_state_session_token(length=30, chars=UNICODE_ASCII_CHARACTER_SET):
        # This is how it's implemented in the official SDK
        rand = SystemRandom()
        state = "".join(rand.choice(chars) for _ in range(length))
        return state

    def _get_redirect_uri(self):
        domain = settings.BASE_BACKEND_URL
        api_uri = self.API_URI
        redirect_uri = f"{domain}{api_uri}"
        return redirect_uri

    def get_authorization_url(self):
        redirect_uri = self._get_redirect_uri()

        state = self._generate_state_session_token()

        params = {
            "response_type": "code",
            "client_id": self._credentials.client_id,
            "redirect_uri": redirect_uri,
            "scope": " ".join(self.SCOPES),
            "state": state,
            "access_type": "offline",
            "include_granted_scopes": "true",
            "prompt": "select_account",
        }

        query_params = urlencode(params)
        authorization_url = f"{self.GOOGLE_AUTH_URL}?{query_params}"

        return authorization_url, state

    # There's more stuff below, which we'll see later
As you can see, all we do is a string interpolation, that results in the authorization_url, passing various GET parameters to that url.
One of the disadvantages of the "raw" flow is that we need to generate everything by hand - even the state value.
As we will see later in this article, we can use the Google's Python API client library to do that for us.
In fact, we've used the implementation for _generate_state_session_token straight from the official client library.
3. Finish the Google login flow by handling the callback request after the user has authenticated successfully with Google
Once the user has successfully authenticated with Google, Google will call the redirect URI, that we have passed as part of the authorization_url.
This is the same redirect URI that we've set in the Google API Console. In fact, if we don't add it there, Google won't call us at all.
Once Google has called us back, we need to do a couple of very important things:
1. Validate the request
Google passes 3 GET parameters to our callback url - code, error and state.
- We'll use
codein order to obtain our tokens -id_tokenandaccess_token. - If there's an error,
erroris going to have value. - And
stateis what we've passed initially, to prevent CSRF attacks.
So, before we get to the tokens, we need to do some request validation, as follows:
from rest_framework import serializers, status
from rest_framework.response import Response


class GoogleLoginApi(PublicApi):
    class InputSerializer(serializers.Serializer):
        code = serializers.CharField(required=False)
        error = serializers.CharField(required=False)
        state = serializers.CharField(required=False)

    def get(self, request, *args, **kwargs):
        input_serializer = self.InputSerializer(data=request.GET)
        input_serializer.is_valid(raise_exception=True)

        validated_data = input_serializer.validated_data

        code = validated_data.get("code")
        error = validated_data.get("error")
        state = validated_data.get("state")

        if error is not None:
            return Response(
                {"error": error},
                status=status.HTTP_400_BAD_REQUEST
            )

        if code is None or state is None:
            return Response(
                {"error": "Code and state are required."},
                status=status.HTTP_400_BAD_REQUEST
            )

        session_state = request.session.get("google_oauth2_state")

        if session_state is None:
            return Response(
                {"error": "CSRF check failed."},
                status=status.HTTP_400_BAD_REQUEST
            )

        del request.session["google_oauth2_state"]

        if state != session_state:
            return Response(
                {"error": "CSRF check failed."},
                status=status.HTTP_400_BAD_REQUEST
            )

        # TODO: More code to follow below
It's a lot of ceremony.
Our implementation is aimed towards ease of debugging and understanding what's going on.
You need to figure out how to do the error handling in your application, based on your requirements.
After we've validated the request - it's time to get the tokens!
2. Get the tokens - id_token and access_token
The id_token represents the user's basic information from their Google account.
Since we want to just do Google login, we are only interested in the id_token.
If we want to do more things with Google related APIs, then the access_token is what we need (usually, paired with the refresh_token).
Actually, we have to pass through these 3 steps, in order to obtain the user information:
- Get the
id_token
import requests


class GoogleRawLoginFlowService:
    # Unrelated code above

    def get_tokens(self, *, code: str) -> GoogleAccessTokens:
        redirect_uri = self._get_redirect_uri()

        data = {
            "code": code,
            "client_id": self._credentials.client_id,
            "client_secret": self._credentials.client_secret,
            "redirect_uri": redirect_uri,
            "grant_type": "authorization_code",
        }

        response = requests.post(self.GOOGLE_ACCESS_TOKEN_OBTAIN_URL, data=data)

        if not response.ok:
            raise ApplicationError("Failed to obtain access token from Google.")

        tokens = response.json()
        google_tokens = GoogleAccessTokens(
            id_token=tokens["id_token"],
            access_token=tokens["access_token"]
        )

        return google_tokens

    # Unrelated code below
We are going to represent those tokens with another simple attrs class:
from attrs import define


@define
class GoogleAccessTokens:
    id_token: str
    access_token: str

    # TODO Decode the id_token
    # See the code snippet below
2. Decode the id_token, which actually represents the user information
from attrs import define
import jwt


@define
class GoogleAccessTokens:
    id_token: str
    access_token: str

    def decode_id_token(self) -> Dict[str, str]:
        id_token = self.id_token
        decoded_token = jwt.decode(jwt=id_token, options={"verify_signature": False})
        return decoded_token
As we can see, id_token is actually a JWT token, which we can decode, in order to obtain the user account information - most importantly - the email.
We use PyJWT to achieve this approach.
2'. Alternatively, get the user information using the access_token
If we want to use access_token (for obtaining user information for example), it would look like this:
from typing import Any, Dict
import requests
from django.conf import settings
from django.core.exceptions import ImproperlyConfigured
from styleguide_example.core.exceptions import ApplicationError


class GoogleRawLoginFlowService:
    # Unrelated code above
    # Reference
    # https://developers.google.com/identity/protocols/oauth2/web-server#callinganapi
    def get_user_info(self, *, google_tokens: GoogleAccessTokens)
        access_token = google_tokens.access_token

        response = requests.get(
            self.GOOGLE_USER_INFO_URL,
            params={"access_token": access_token}
        )

        if not response.ok:
            raise ApplicationError("Failed to obtain user info from Google.")

        return response.json()
3. Return the user information.
After you have the user information, it's up to you to do with it whatever your application aims for.
In our example below, we have just shown a simple validation of the user and standard Django login.
from django.contrib.auth import login
from rest_framework import status
from rest_framework.response import Response
from styleguide_example.blog_examples.google_login_server_flow.raw.service import (
    GoogleRawLoginFlowService,
)
from styleguide_example.users.selectors import user_get


class GoogleLoginApi(PublicApi):
    # Here we have the serializer class from above.

	def get(self, request, *args, **kwargs):
        # Here we have made the request validations.

        google_login_flow = GoogleRawLoginFlowService()

        google_tokens = google_login_flow.get_tokens(code=code)

        id_token_decoded = google_tokens.decode_id_token()
        user_info = google_login_flow.get_user_info(google_tokens=google_tokens)

        user_email = id_token_decoded["email"]
        user = user_get(email=user_email)

        if user is None:
            return Response(
                {"error": f"User with email {user_email} is not found."},
                status=status.HTTP_404_NOT_FOUND
            )

        login(request, user)

        result = {
            "id_token_decoded": id_token_decoded,
            "user_info": user_info,
        }

        return Response(result)
There are plenty of options for how to approach this:
- Check if this user exists and if the user exists - log the user in.
- Check if this user exists and if the user doesn't exist - return an error.
- Check if this user exists and if the user doesn't exist - create the user and then log the user in.
This is up to your specific requirements & use case.
For the full example, it's best to check our Django Styleguide Example repository here.
Implementing the sdk flow
Now, let's implement Google Login with Google's Python API Client.
We will follow this guide - https://developers.google.com/identity/protocols/oauth2/web-server - and put it in Django context.
1. Obtain Google Login credentials
Obtaining the required Google credentials for the sdk flow is the same as in the raw flow that we just showcased.
Again, we need client_id, client_secret and project_id.
from attrs import define
from django.conf import settings
from django.core.exceptions import ImproperlyConfigured


@define
class GoogleSdkLoginCredentials:
    client_id: str
    client_secret: str
    project_id: str


def google_sdk_login_get_credentials() -> GoogleSdkLoginCredentials:
    client_id = settings.GOOGLE_OAUTH2_CLIENT_ID
    client_secret = settings.GOOGLE_OAUTH2_CLIENT_SECRET
    project_id = settings.GOOGLE_OAUTH2_PROJECT_ID

    if not client_id:
        raise ImproperlyConfigured("GOOGLE_OAUTH2_CLIENT_ID missing in env.")

    if not client_secret:
        raise ImproperlyConfigured("GOOGLE_OAUTH2_CLIENT_SECRET missing in env.")

    if not project_id:
        raise ImproperlyConfigured("GOOGLE_OAUTH2_PROJECT_ID missing in env.")

    credentials = GoogleSdkLoginCredentials(
        client_id=client_id,
        client_secret=client_secret,
        project_id=project_id
    )

    return credentials
The disadvantage here is that we have to generate a client configuration with the same structure as the official client_secret.json file, taken from the Google API Console.
In the code snippet below, we have shown and highlighted the method _generate_client_config, which handles this requirement.
from django.conf import settings
from django.urls import reverse_lazy


class GoogleSdkLoginFlowService:
    API_URI = reverse_lazy("api:google-oauth2:login-sdk:callback-sdk")

    # Two options are available: 'web', 'installed'
    GOOGLE_CLIENT_TYPE = "web"

    GOOGLE_AUTH_URL = "https://accounts.google.com/o/oauth2/auth"
    GOOGLE_ACCESS_TOKEN_OBTAIN_URL = "https://oauth2.googleapis.com/token"
    GOOGLE_USER_INFO_URL = "https://www.googleapis.com/oauth2/v3/userinfo"

    # Add auth_provider_x509_cert_url if you want verification on JWTS such as ID tokens
    GOOGLE_AUTH_PROVIDER_CERT_URL = ""

    SCOPES = [
        "https://www.googleapis.com/auth/userinfo.email",
        "https://www.googleapis.com/auth/userinfo.profile",
        "openid",
    ]

    def __init__(self):
        self._credentials = google_sdk_login_get_credentials()

    def _get_redirect_uri(self):
        domain = settings.BASE_BACKEND_URL
        api_uri = self.API_URI
        redirect_uri = f"{domain}{api_uri}"
        return redirect_uri

    def _generate_client_config(self):
        # This follows the structure of the official "client_secret.json" file
        client_config = {
            self.GOOGLE_CLIENT_TYPE: {
                "client_id": self._credentials.client_id,
                "project_id": self._credentials.project_id,
                "auth_uri": self.GOOGLE_AUTH_URL,
                "token_uri": self.GOOGLE_ACCESS_TOKEN_OBTAIN_URL,
                "auth_provider_x509_cert_url": self.GOOGLE_AUTH_PROVIDER_CERT_URL,
                "client_secret": self._credentials.client_secret,
                "redirect_uris": [self._get_redirect_uri()],
                # If you are dealing with single page applications,
                # you'll need to set this both in Google API console
                # and here.
                "javascript_origins": [],
            }
        }
        return client_config

    # The next step here is to implement get_authorization_url
2. Start the Google Login flow by redirecting to Google's login page
Building the authorization_url is exactly the same as in the raw flow.
You can use exactly the same Django Rest Framework APIs or Django views, provided in theraw flow, but you have to substitute theGoogleRawLoginFlowServicewithGoogleSdkLoginFlowService.
Here we also need to add the state parameter to the session, the same way we have done it in the raw flow, in order to prevent cross-site request forgery attacks.
from django.shortcuts import redirect
from rest_framework.views import APIView

from styleguide_example.blog_examples.google_login_server_flow.sdk.services import (
    GoogleSdkLoginFlowService,
)


class PublicApi(APIView):
    authentication_classes = ()
    permission_classes = ()


class GoogleLoginRedirectApi(PublicApi):
    def get(self, request, *args, **kwargs):
        google_login_flow = GoogleSdkLoginFlowService()

        authorization_url, state = google_login_flow.get_authorization_url()

        request.session["google_oauth2_state"] = state

        return redirect(authorization_url)
Here is the part, where we rely on the Google's Python API Client to handle things for us.
As you can see below, we have used the Flow class from google_auth_oauthlib.flow, which takes care to generate and return not only the authorization_url, but the state value too.
We have highlighted the important part - get_authorization_url.
import google_auth_oauthlib.flow
from django.conf import settings
from django.urls import reverse_lazy


class GoogleSdkLoginFlowService:
    API_URI = reverse_lazy("api:google-oauth2:login-sdk:callback-sdk")

    # Two options are available: 'web', 'installed'
    GOOGLE_CLIENT_TYPE = "web"

    GOOGLE_AUTH_URL = "https://accounts.google.com/o/oauth2/auth"
    GOOGLE_ACCESS_TOKEN_OBTAIN_URL = "https://oauth2.googleapis.com/token"
    GOOGLE_USER_INFO_URL = "https://www.googleapis.com/oauth2/v3/userinfo"

    # Add auth_provider_x509_cert_url if you want verification on JWTS such as ID tokens
    GOOGLE_AUTH_PROVIDER_CERT_URL = ""

    SCOPES = [
        "https://www.googleapis.com/auth/userinfo.email",
        "https://www.googleapis.com/auth/userinfo.profile",
        "openid",
    ]

    def __init__(self):
        self._credentials = google_sdk_login_get_credentials()

    def _get_redirect_uri(self):
        domain = settings.BASE_BACKEND_URL
        api_uri = self.API_URI
        redirect_uri = f"{domain}{api_uri}"
        return redirect_uri

    def _generate_client_config(self):
        # This follows the structure of the official "client_secret.json" file
        client_config = {
            self.GOOGLE_CLIENT_TYPE: {
                "client_id": self._credentials.client_id,
                "project_id": self._credentials.project_id,
                "auth_uri": self.GOOGLE_AUTH_URL,
                "token_uri": self.GOOGLE_ACCESS_TOKEN_OBTAIN_URL,
                "auth_provider_x509_cert_url": self.GOOGLE_AUTH_PROVIDER_CERT_URL,
                "client_secret": self._credentials.client_secret,
                "redirect_uris": [self._get_redirect_uri()],
                "javascript_origins": [],
            }
        }
        return client_config

    # Reference:
    # https://developers.google.com/identity/protocols/oauth2/web-server#creatingclient
    def get_authorization_url(self):
        redirect_uri = self._get_redirect_uri()
        client_config = self._generate_client_config()

        google_oauth_flow = google_auth_oauthlib.flow.Flow.from_client_config(
            client_config=client_config, scopes=self.SCOPES
        )
        google_oauth_flow.redirect_uri = redirect_uri

        authorization_url, state = google_oauth_flow.authorization_url(
            access_type="offline",
            include_granted_scopes="true",
            prompt="select_account",
        )
        return authorization_url, state

        # Code, unrelated to this example, below
3. Finish the Google login flow by handling the callback request after the user has authenticated successfully with Google
Again, we need a new API or View, to handle the callback.
You can use exactly the same Django Rest Framework APIs or Django views, provided in theraw flow, but you have to substitute theGoogleRawLoginFlowServicewithGoogleSdkLoginFlowService.
1. Validate the request
The flow for state validation is also the same as in raw flow.
from rest_framework import serializers, status
from rest_framework.response import Response


class GoogleLoginApi(PublicApi):
    class InputSerializer(serializers.Serializer):
        code = serializers.CharField(required=False)
        error = serializers.CharField(required=False)
        state = serializers.CharField(required=False)

    def get(self, request, *args, **kwargs):
        input_serializer = self.InputSerializer(data=request.GET)
        input_serializer.is_valid(raise_exception=True)

        validated_data = input_serializer.validated_data

        code = validated_data.get("code")
        error = validated_data.get("error")
        state = validated_data.get("state")

        if error is not None:
            return Response(
                {"error": error},
                status=status.HTTP_400_BAD_REQUEST
            )

        if code is None or state is None:
            return Response(
                {"error": "Code and state are required."},
                status=status.HTTP_400_BAD_REQUEST
            )

        session_state = request.session.get("google_oauth2_state")

        if session_state is None:
            return Response(
                {"error": "CSRF check failed."},
                status=status.HTTP_400_BAD_REQUEST
            )

        del request.session["google_oauth2_state"]

        if state != session_state:
            return Response(
                {"error": "CSRF check failed."},
                status=status.HTTP_400_BAD_REQUEST
            )

        # More code below
2. Get the tokens - id_token and access_token
The purpose here is also to obtain the id_token of the user.
If we want to do more things with Google related APIs, then we have to obtain the access_token as well.
The three steps to obtain user information here are the following:
1. Get the Google tokens.
Obtaining Google tokens is facilitated from the given Flow class, which eliminates the necessity of calling the Google API to obtain the tokens.
import google_auth_oauthlib.flow
import requests
from styleguide_example.core.exceptions import ApplicationError


class GoogleSdkLoginFlowService:
	# Here we have the implementation of get_authorization_url

    def get_tokens(self, *, code: str, state: str) -> GoogleAccessTokens:
        redirect_uri = self._get_redirect_uri()
        client_config = self._generate_client_config()

        flow = google_auth_oauthlib.flow.Flow.from_client_config(
            client_config=client_config, scopes=self.SCOPES, state=state
        )
        flow.redirect_uri = redirect_uri
        access_credentials_payload = flow.fetch_token(code=code)

        if not access_credentials_payload:
            raise ApplicationError("Failed to obtain tokens from Google.")

        google_tokens = GoogleAccessTokens(
            id_token=access_credentials_payload["id_token"],
            access_token=access_credentials_payload["access_token"]
        )

        return google_tokens

    # More code follows below
We are going to represent those tokens again with the same attrs class:
from attrs import define


@define
class GoogleAccessTokens:
    id_token: str
    access_token: str
2. Decode the id_token, which actually represents the user information.
Now, we can do the same as above - treat the id_token as a JWT token & decode it to get the public information, which represents the user's Google account.
from attrs import define
import jwt


@define
class GoogleAccessTokens:
    id_token: str
    access_token: str

    def decode_id_token(self) -> Dict[str, Any]:
        id_token = self.id_token
        decoded_token = jwt.decode(jwt=id_token, options={"verify_signature": False})
        return decoded_token
2'. Alternatively, get the user information using the access_token
If we want to use access_token, it would look like this:
from typing import Any, Dict
import requests
from styleguide_example.core.exceptions import ApplicationError


class GoogleSdkLoginFlowService:
	# Here we have implemented another methods
    # See the code snippets above or our Django Styleguide Example.

    # Reference:
    # https://developers.google.com/identity/protocols/oauth2/web-server#callinganapi
    def get_user_info(self, *, google_tokens: GoogleAccessTokens)
        access_token = google_tokens.access_token

        response = requests.get(
            self.GOOGLE_USER_INFO_URL,
            params={"access_token": access_token}
        )

        if not response.ok:
            raise ApplicationError("Failed to obtain user info from Google.")

        return response.json()
3. Return the user information.
Once again, here, it's up to us what to do with the newly obtained account information.
In our example, we are simply logging the user in.
from django.contrib.auth import login
from rest_framework import status
from rest_framework.response import Response
from styleguide_example.blog_examples.google_login_server_flow.sdk.services import (
    GoogleSdkLoginFlowService,
)
from styleguide_example.users.selectors import user_get


# See the implementation of PublicApi class in the previous code snippets.


class GoogleLoginApi(PublicApi):
	# Here we have the serializer class.


    def get(self, request, *args, **kwargs):
    	# Here we have made the request validation.

        google_login_flow = GoogleSdkLoginFlowService()

        google_tokens = google_login_flow.get_tokens(code=code, state=state)

        id_token_decoded = google_tokens.decode_id_token()
        user_info = google_login_flow.get_user_info(google_tokens=google_tokens)

        user_email = id_token_decoded["email"]
        user = user_get(email=user_email)

        if user is None:
            return Response(
                {"error": f"User with email {user_email} is not found."},
                status=status.HTTP_404_NOT_FOUND
            )

        login(request, user)

        result = {
            "id_token_decoded": id_token_decoded,
            "user_info": user_info,
        }

        return Response(result)
For the full example, it's best to check our Django Styleguide Example repository here.
Conclusion
The two flows presented above - raw and sdk - are going to produce the same result - getting your users to be able to login with Google. They only differ in implementation.
If you simply want to add "Google login" to an already existing Django application that's not using django-allauth (or similar dependencies) - this is the approach we'd recommend.
Of course, the examples above should be taken into the context of your application.
We hope this was valuable for you! And if that's the case - write us a comment & share the article 🤗