
Need help with your Django project?
Check our django services
TL;DR - The entire implementation can be found in our Django Styleguide Example + Example React Project.
Introduction
File upload tend to show up as a feature in most web apps.
When dealing with file upload in Django, we usually work with request.FILES and FileField, and in combination with django-storages, to store those files some places better (like AWS S3).
Uploading files in a standard way, thru our web server, may have bad results for our general app performance:
- While a worker is handling the file upload, it cannot handle other incoming requests.
- How fast the file is going to be uploaded depends on the internet speed of the user, and we don't have much control over that.
In this article, we are going to explore an alternative way for uploading files - the so-called "direct upload". The implementation builds on top of the idea of this Heroku devcenter article.
We are going to implement a direct upload that works both for S3 & for local development.
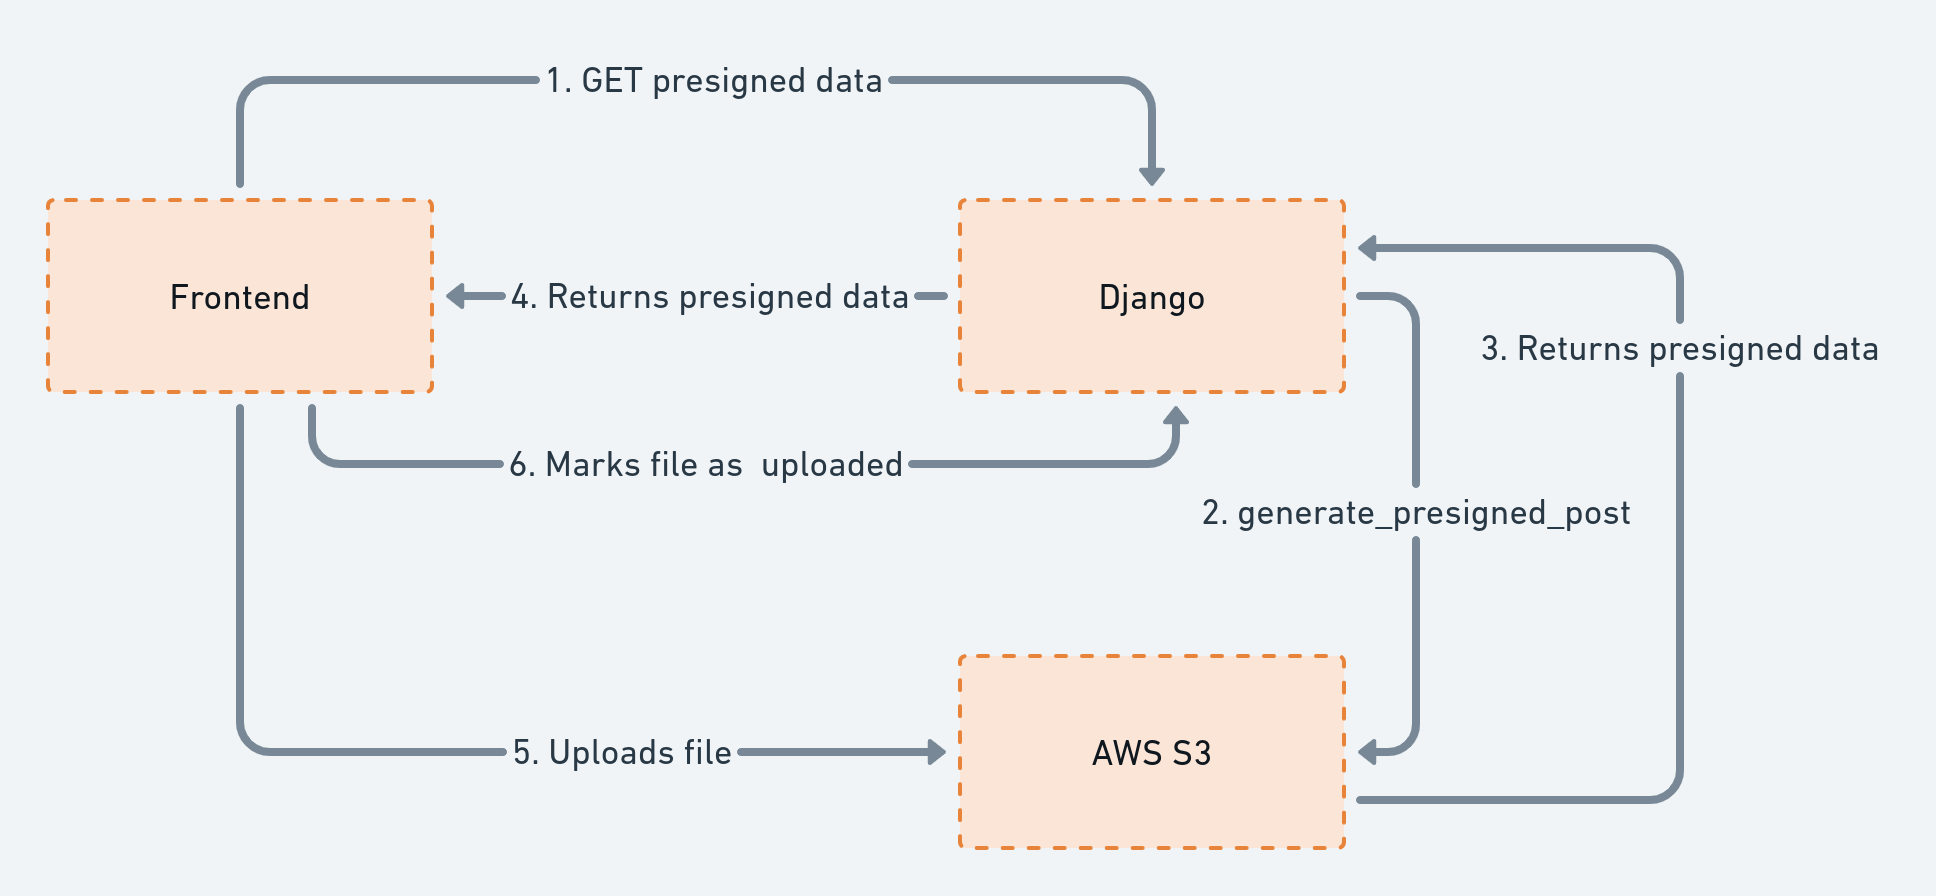
Here's the flow:
- Our JavaScript frontend calls our Django backend & obtains presigned data, that's going to be used for the direct upload.
- Our JavaScript frontend uploads the file directly, to a url obtained from the presigned data. This upload bypasses our Django backend. This is the "direct upload".
- Finally, our JavaScript frontend calls our Django backend to mark the file as successfully uploaded. That's it.
Here's a diagram, showing the flow. Follow the numbers.
Let's see how we can achieve this.
The model
Heads up: We are presenting a minimal version of the model, to illustrate the concept. Adapt this to your needs. For example, we often want to track who has uploaded the file in an uploaded_by field.Let's start with our Django model.
# Example simplified from here
# https://github.com/HackSoftware/Django-Styleguide-Example/blob/master/styleguide_example/files/models.py

from django.db import models
from django.conf import settings


def file_generate_upload_path(instance, filename):
	# Both filename and instance.file_name should have the same values
    return f"files/{instance.file_name}"


class File(models.Model):
    file = models.FileField(
        upload_to=file_generate_upload_path,
        blank=True,
        null=True
    )

    original_file_name = models.TextField()

    file_name = models.CharField(max_length=255, unique=True)
    file_type = models.CharField(max_length=255)

    upload_finished_at = models.DateTimeField(blank=True, null=True)

    @property
    def is_valid(self):
        """
        We consider a file "valid" if the the datetime flag has value.
        """
        return bool(self.upload_finished_at)

    @property
    def url(self):
        if settings.FILE_UPLOAD_STORAGE == "s3":
            return self.file.url

        return f"{settings.APP_DOMAIN}{self.file.url}"
There are a bunch of things going on here, that we need to address:
- Although we are bypassing the backend with the actual file upload, we still want to use a
FileField. Reason being - we want this file upload to work from the Django admin too! We'll see this in play later on. - Since our upload flow takes 3 steps, we'll consider files "successfully uploaded", if they have a value for the
upload_finished_atfield. - When constructing the
url, we always want to end up with a full url, and not just partial media path -/media/some/file.png. That's why we are using theAPP_DOMAINvalue, which is defined in the next section.
Now, let's take a look at the settings we need.
The settings
Heads up: Since we don't want to complicate the example, we are using the minimal amount of settings. The settings are usingenv, taken fromdjango-environ
Here are the settings that we need, to get everything running. Take a moment to scan thru everything and we'll explain the important stuff after that.
# Example simplified from here
# https://github.com/HackSoftware/Django-Styleguide-Example/blob/master/config/settings/files_and_storages.py

import os
import environ

env = environ.Env()


BASE_DIR = environ.Path(__file__) - 2 # This depends on your setup

APP_DOMAIN = env("APP_DOMAIN", default="http://localhost:8000")

FILE_UPLOAD_STORAGE = env("FILE_UPLOAD_STORAGE", default="local")  # local | s3

if FILE_UPLOAD_STORAGE == "local":
    MEDIA_ROOT_NAME = "media"
    MEDIA_ROOT = os.path.join(BASE_DIR, MEDIA_ROOT_NAME)
    MEDIA_URL = f"/{MEDIA_ROOT_NAME}/"

if FILE_UPLOAD_STORAGE == "s3":
    # Using django-storages
    # https://django-storages.readthedocs.io/en/latest/backends/amazon-S3.html
    DEFAULT_FILE_STORAGE = 'storages.backends.s3boto3.S3Boto3Storage'

    AWS_S3_ACCESS_KEY_ID = env("AWS_S3_ACCESS_KEY_ID")
    AWS_S3_SECRET_ACCESS_KEY = env("AWS_S3_SECRET_ACCESS_KEY")
    AWS_STORAGE_BUCKET_NAME = env("AWS_STORAGE_BUCKET_NAME")
    AWS_S3_REGION_NAME = env("AWS_S3_REGION_NAME")
    AWS_S3_SIGNATURE_VERSION = env("AWS_S3_SIGNATURE_VERSION", default="s3v4")

    # https://docs.aws.amazon.com/AmazonS3/latest/userguide/acl-overview.html#canned-acl
    AWS_DEFAULT_ACL = env("AWS_DEFAULT_ACL", default="private")

    AWS_PRESIGNED_EXPIRY = env.int("AWS_PRESIGNED_EXPIRY", default=10)  # seconds
Let's break this down:
- For local development, we want to support local upload - files going to the
MEDIA_ROOTfolder. More on the settings aroundMEDIA_*, you can check here - https://docs.djangoproject.com/en/4.0/topics/files/ - For S3, we'll be handling the uploads in 2 ways - Via
django-storagesand viaboto3. Those AWS related settings will cover both.
We highly recommend reading the entire django-storages documentation, related to S3 - https://django-storages.readthedocs.io/en/latest/backends/amazon-S3.html - in order to better understand those settings.
Direct to S3 upload
Heads up: We are following the Django Styleguide, extracting the business logic in a service layer.
Okay, let's eat the frog first!
In order to do the direct to S3 upload, we'll need a couple of parts:
- A bunch of APIs & services, that'll handle the flow of start, finish & the edge-case of direct to local upload.
- A piece of code, working with
boto3, that will generated the presigned post payload, using https://boto3.amazonaws.com/v1/documentation/api/latest/reference/services/s3.html#S3.Client.generate_presigned_post - JavaScript code to handle the flow on the client.
APIs & Services
Before we dive into the code, let's take a look at the URLs that we are going to expose. This can be helpful to visualize:
/api/upload/direct/start/- We'll be sending file name & file type. The API will return the presigned data. Part of the presigned data is the url, where we are going to upload to./api/upload/direct/finish/- We'll be calling this once the direct upload has finished. This will mark the file as successfully uploaded./api/upload/direct/local/<str:file_id>/- This is the "edge-case" endpoint, for doing direct upload, but locally. This is for local development, when we don't want to be running with AWS / S3 credentials.
Again, we want to have the same backend interface & frontend code, no matter if we are uploading "direct to local" or "direct to S3".
Now, let's see the APIs (examples taken from here):
# Example simplified from here
# https://github.com/HackSoftware/Django-Styleguide-Example/blob/master/styleguide_example/files/apis.py

from django.shortcuts import get_object_or_404

from rest_framework import serializers
from rest_framework.response import Response
from rest_framework.views import APIView

from styleguide_example.files.models import File
from styleguide_example.files.services import (
    FileDirectUploadService
)

from styleguide_example.api.mixins import ApiAuthMixin


class FileDirectUploadStartApi(ApiAuthMixin, APIView):
    class InputSerializer(serializers.Serializer):
        file_name = serializers.CharField()
        file_type = serializers.CharField()

    def post(self, request, *args, **kwargs):
        serializer = self.InputSerializer(data=request.data)
        serializer.is_valid(raise_exception=True)

        service = FileDirectUploadService(request.user)
        presigned_data = service.start(**serializer.validated_data)

        return Response(data=presigned_data)


class FileDirectUploadFinishApi(ApiAuthMixin, APIView):
    class InputSerializer(serializers.Serializer):
        file_id = serializers.CharField()

    def post(self, request):
        serializer = self.InputSerializer(data=request.data)
        serializer.is_valid(raise_exception=True)

        file_id = serializer.validated_data["file_id"]

        file = get_object_or_404(File, id=file_id)

        service = FileDirectUploadService(request.user)
        service.finish(file=file)

        return Response({"id": file.id})


class FileDirectUploadLocalApi(ApiAuthMixin, APIView):
    def post(self, request, file_id):
        file = get_object_or_404(File, id=file_id)

        file_obj = request.FILES["file"]

        service = FileDirectUploadService(request.user)
        file = service.upload_local(file=file, file_obj=file_obj)

        return Response({"id": file.id})
Things are, more or less, pretty straightforward.
As you can see, we are calling the FileDirectUploadService, so let's see the implementation 👀.
We've highlighted the important parts.
# Example simplified from here
# https://github.com/HackSoftware/Django-Styleguide-Example/blob/master/styleguide_example/files/services.py

from django.conf import settings
from django.db import transaction
from django.utils import timezone


class FileDirectUploadService:
    @transaction.atomic
    def start(self, *, file_name: str, file_type: str):
        file = File(
            original_file_name=file_name,
            file_name=file_generate_name(file_name),
            file_type=file_type,
            file=None
        )
        file.full_clean()
        file.save()

        upload_path = file_generate_upload_path(file, file.file_name)

        """
        We are doing this in order to have an associated file for the field.
        """
        file.file = file.file.field.attr_class(file, file.file.field, upload_path)
        file.save()

        presigned_data = {}

        if settings.FILE_UPLOAD_STORAGE == "s3":
            presigned_data = s3_generate_presigned_post(
                file_path=upload_path, file_type=file.file_type
            )
        else:
            presigned_data = {
                "url": file_generate_local_upload_url(file_id=str(file.id)),
            }

        return {"id": file.id, **presigned_data}

    @transaction.atomic
    def finish(self, *, file: File) -> File:
        file.upload_finished_at = timezone.now()
        file.full_clean()
        file.save()

        return file

    @transaction.atomic
    def upload_local(self, *, file: File, file_obj) -> File:
        file.file = file_obj
        file.full_clean()
        file.save()

        return file
Let's zoom in the highlighted areas.
First, let's see the implementation of file_generate_name:
import pathlib
from uuid import uuid4


def file_generate_name(original_file_name):
    extension = pathlib.Path(original_file_name).suffix

    return f"{uuid4().hex}{extension}"
The idea is simple - generate an unique name, preserving the file extension:
>>> file_generate_name("cool_logo.png")
'6252b29191a84f9a95f35b4c585fc65e.png'
For file_generate_upload_path, we are using the same implementation as above (where we defined the model)
Now, this part is really interesting:
file.file = file.file.field.attr_class(file, file.file.field, upload_path)
file.save()
We are doing a direct upload, meaning no file will be actually uploaded to the backend, yet, we have a FileField and we want to set a value for that FileField.
We are doing this, because we want to preseve the ability to manage those files via the Django admin & also upload additional files, in a standard way, via the Django admin.
That's why we need the FileField and we need to make sure it gets its value.
Otherwise, we'll get an error:
ValueError at /admin/files/file/
The 'file' attribute has no file associated with it.
Now, for the spicy part.
We have an if statement, that decides what kind of presigned post data we are going to generate.
First, let's look at the local branch - file_generate_local_upload_url - we need to generate an url, where the file is going to be uploaded to, from the frontend:
from django.urls import reverse
from django.conf import settings


def file_generate_local_upload_url(*, file_id: str):
    url = reverse(
        "api:files:upload:direct:local",
        kwargs={"file_id": file_id}
    )

    return f"{settings.APP_DOMAIN}{url}"
We do a simple reverse & build a full url, with the domain, so the frontend can upload there, without actually caring if its localhost or some place else.
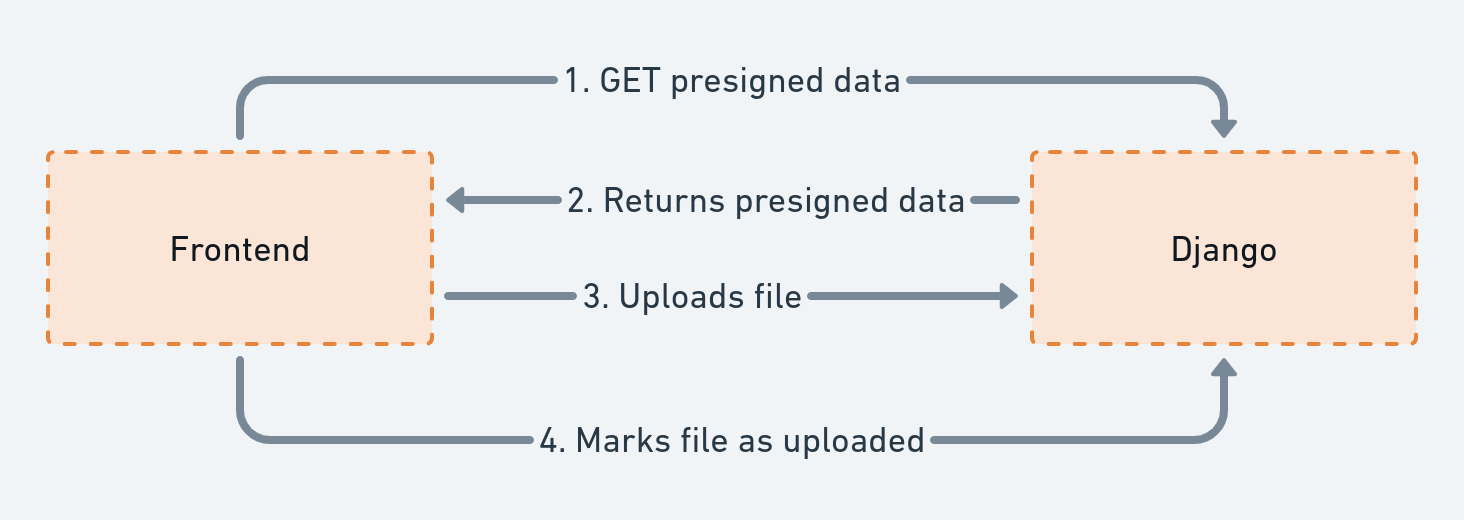
Here's the diagram for the "direct to local" upload:
For the S3 part, let's jump in a new section!
S3 presigned post
In order to generate the presigned post, we are going to use boto3 & more specifically, the S3 client.
This is the function that we want to use - https://boto3.amazonaws.com/v1/documentation/api/latest/reference/services/s3.html#S3.Client.generate_presigned_post
Here's the implementation:
# Example simplified from here
# https://github.com/HackSoftware/Django-Styleguide-Example/blob/master/styleguide_example/integrations/aws/client.py

from django.conf import settings

import boto3


def s3_get_client():
    return boto3.client(
        service_name="s3",
        aws_access_key_id=settings.AWS_S3_ACCESS_KEY_ID,
        aws_secret_access_key=settings.AWS_S3_SECRET_ACCESS_KEY,
        region_name=settings.AWS_S3_REGION_NAME
    )


def s3_generate_presigned_post(*, file_path: str, file_type: str):
    s3_client = s3_get_client()

    acl = settings.AWS_DEFAULT_ACL
    expires_in = settings.AWS_PRESIGNED_EXPIRY

    presigned_data = s3_client.generate_presigned_post(
        settings.AWS_S3_BUCKET_NAME,
        file_path,
        Fields={
            "acl": acl,
            "Content-Type": file_type
        },
        Conditions=[
            {"acl": acl},
            {"Content-Type": file_type},
        ],
        ExpiresIn=expires_in,
    )

    return presigned_data
The value for ExpiresIn, in seconds, is important. The generated presigned post can only be used within that specific time window!
Additionally, S3 will check against the Fields and Conditions, making sure we are uploading what we've asked for.
A call to s3_generate_presigned_post returns a data structure, that looks like this:
    {
        'fields': {
            'Content-Type': 'image/png',
            'acl': 'private',
            'key': 'files/bafdccb665a447468e237781154883b5.png',
            'policy': 'some-long-base64-string',
            'x-amz-algorithm': 'AWS4-HMAC-SHA256',
            'x-amz-credential': 'AKIASOZLZI5FJDJ6XTSZ/20220405/eu-central-1/s3/aws4_request',
            'x-amz-date': '20220405T114912Z',
            'x-amz-signature': '7d8be89aabec12b781d44b5b3f099d07be319b9a41d9a9c804bd1075e1ef5735'
        },
        'url': 'https://django-styleguide-example.s3.amazonaws.com/'
    }
This is what we are going to return to the frontend & what our JavaScript is going to use to upload the file directly to S3.
The presigned data will also serve as authentication for the file upload.
We recommend reading the following materials, to get a better understanding of what's happening:
- https://boto3.amazonaws.com/v1/documentation/api/latest/reference/services/s3.html#S3.Client.generate_presigned_post
- What
Conditionsare supported - https://docs.aws.amazon.com/AmazonS3/latest/API/sigv4-HTTPPOSTConstructPolicy.html
Before we jump to the frontend, a few words on the S3 bucket itself.
The S3 bucket
In order to test this, you'll need a S3 bucket:
- You can create it with default values (basically next, next, done in the console). This will result in all files being private and requiring a
privatevalue for the ACL. - The additional configuration that we need to make is to add CORS config for our bucket. The JSON follows:
[
    {
        "AllowedHeaders": [
            "*"
        ],
        "AllowedMethods": [
            "POST"
        ],
        "AllowedOrigins": [
            "*"
        ],
        "ExposeHeaders": []
    }
]
With this, we are good to go.
Now, how your S3 bucket configuration is going to look like is up to you. That's why we recommend reading thru the following materials:
- https://docs.aws.amazon.com/AmazonS3/latest/userguide/acl-overview.html#canned-acl
- https://django-storages.readthedocs.io/en/latest/backends/amazon-S3.html
- https://docs.aws.amazon.com/AmazonS3/latest/userguide/cors.html
This will give you a better understanding at how to approach things, if you want the files in your bucket to be public-read, for example.
Now, let's do a quick look on the frontend 👀
The frontend
Heads up: You can find an example frontend implementation here - https://github.com/HackSoftware/Example-React-Project
We are going to show an example, using React.
The dependencies are minimal:
create-react-app- https://create-react-app.dev/axios- https://github.com/axios/axios
import axios from 'axios';
import { useState } from 'react';

import { BASE_BACKEND_URL } from 'config/urls';
import { getConfig } from 'config/api';

const directUploadStart = ({ fileName, fileType }) => {
  return axios.post(
    `${BASE_BACKEND_URL}/api/files/upload/direct/start/`,
    { file_name: fileName, file_type: fileType },
    getConfig()
  );
};

const directUploadDo = ({ data, file }) => {
  const postData = new FormData();

  for (const key in data?.fields) {
    postData.append(key, data.fields[key]);
  }

  postData.append('file', file);

  let postParams = getConfig();

  // If we're uploading to S3, detach the authorization cookie.
  // Otherwise, we'll get CORS error from S3
  if (data?.fields) {
    postParams = {};
  }

  return axios
    .post(data.url, postData, postParams)
    .then(() => Promise.resolve({ fileId: data.id }));
};

const directUploadFinish = ({ data }) => {
  return axios.post(
    `${BASE_BACKEND_URL}/api/files/upload/direct/finish/`,
    { file_id: data.id },
    getConfig()
  );
};

const DirectUploadExample = () => {
  const [message, setMessage] = useState();

  const onInputChange = (event) => {
    const file = event.target.files[0];

    if (file) {
      directUploadStart({
        fileName: file.name,
        fileType: file.type
      })
        .then((response) =>
          directUploadDo({ data: response.data, file })
            .then(() => directUploadFinish({ data: response.data }))
            .then(() => {
              setMessage('File upload completed!');
            })
        )
        .catch((error) => {
          setMessage('File upload failed!');
        });
    }
  };

  return (
    <div>
      <h1>Direct upload</h1>
      <div>Select files to upload:</div>

      <input id="input" type="file" onChange={onInputChange} />

      <div>{message}</div>
    </div>
  );
};

export default DirectUploadExample;
The entire upload flow is implemented via:
directUploadStart- gets the presigned post data from the backend.directUploadDo- does the actual file upload to the url, returned fromdirectUploadStart.directUploadFinish- calls the backend, to mark the file as successfully uploaded.
Now, there's a tricky part, that we need to be mindful of:
- Since we want to support both "direct to s3" and "direct to local" uploads.
- And local uploads may require passing additional data for authentication - like the
Authorizationheader. - If we write the code to always pass the
Auhtorizationheader, this will break the upload to S3, since S3 is not expecting those extra headers.
This is the reason this piece of code exists:
    // If we're uploading to S3, detach the authorization cookie.
    // Otherwise, we'll get CORS error from S3
    if (data?.fields) {
      postParams = {};
    }
We know that based on the presence of fields in the payload. This is a simple solution & we can be smarter here, but we don't want to complicate the example too much.
Extra credit: File upload in Django admin works just fine 👌
The usual struggle that we see in such "direct to S3" upload implementations is omitting the FileField from your model.
This means you can no-longer manage & upload files from your Django admin.
That's why our proposed implementation takes care of that.
In order to make it work, we need to do 2 things:
- Change our
FileAdmina bit. - Add one more service to handle the case.
Let's do that!
The FileAdmin
Heads up: The upload done from the admin will be a "standard" one, going thru our Django web servers. This is the straight-forward implementation that requires few small adjustments. If we want a "direct" approach via the Django admin, this will require more changes.
We need to plug into our admin to avoid the default implementation & use our service instead.
Here's how the admin looks like:
# https://github.com/HackSoftware/Django-Styleguide-Example/blob/master/styleguide_example/files/admin.py
from django import forms

from django.contrib import admin, messages
from django.core.exceptions import ValidationError

from styleguide_example.files.models import File
from styleguide_example.files.services import (
    FileStandardUploadService
)


class FileForm(forms.ModelForm):
    class Meta:
        model = File
        fields = ["file"]


@admin.register(File)
class FileAdmin(admin.ModelAdmin):
    list_display = [
        "id",
        "original_file_name",
        "file_name",
        "file_type",
        "url",
        "upload_finished_at",
        "is_valid",
    ]

    def get_form(self, request, obj=None, **kwargs):
        """
        That's a bit of a hack
        Dynamically change self.form, before delegating to the actual ModelAdmin.get_form
        Proper kwargs are form, fields, exclude, formfield_callback
        """
        if obj is None:
            self.form = FileForm

        return super().get_form(request, obj, **kwargs)

    def get_readonly_fields(self, request, obj=None):
        """
        We want to show those fields only when we have an existing object.
        """

        if obj is not None:
            return [
                "original_file_name",
                "file_name",
                "file_type",
                "upload_finished_at"
            ]

        return []

    def save_model(self, request, obj, form, change):
        try:
            cleaned_data = form.cleaned_data

            service = FileStandardUploadService(
                file_obj=cleaned_data["file"]
            )

            if change:
                service.update(file=obj)
            else:
                service.create()
        except ValidationError as exc:
            self.message_user(request, str(exc), messages.ERROR)
There are 2 key points here:
- We are doing a bit of a hack with the redefinition of
get_form, in order to mutate the instance with the proper form. We are doing this, because we only want to show the file input field & nothing else! The rest of the fields are going to be inferred. - We are redefining
save_model, in order to use ourFileStandardUploadService.
With that, the only thing that's left is the implementation of the service.
The FileStandardUploadService
Again, we are taking the approach with a class-based service, because it fits nicely:
# https://github.com/HackSoftware/Django-Styleguide-Example/blob/master/styleguide_example/files/services.py

import mimetypes

from styleguide_example.files.models import File


class FileStandardUploadService:
    """
    This also serves as an example of a service class,
    which encapsulates 2 different behaviors (create & update) under a namespace.

    Meaning, we use the class here for:

    1. The namespace
    2. The ability to reuse `_infer_file_name_and_type` (which can also be an util)
    """
    def __init__(self, file_obj):
        self.file_obj = file_obj

    def _infer_file_name_and_type(self, file_name: str = "", file_type: str = ""):
        if not file_name:
            file_name = self.file_obj.name

        if not file_type:
            guessed_file_type, encoding = mimetypes.guess_type(file_name)

            if guessed_file_type is None:
                file_type = ""
            else:
                file_type = guessed_file_type

        return file_name, file_type

    @transaction.atomic
    def create(self, file_name: str = "", file_type: str = "") -> File:
        file_name, file_type = self._infer_file_name_and_type(file_name, file_type)

        obj = File(
            file=self.file_obj,
            original_file_name=file_name,
            file_name=file_generate_name(file_name),
            file_type=file_type,
            upload_finished_at=timezone.now()
        )

        obj.full_clean()
        obj.save()

        return obj

    @transaction.atomic
    def update(self, file: File, file_name: str = "", file_type: str = "") -> File:
        file_name, file_type = self._infer_file_name_and_type(file_name, file_type)

        file.file = self.file_obj
        file.original_file_name = file_name
        file.file_name = file_generate_name(file_name)
        file.file_type = file_type
        file.upload_finished_at = timezone.now()

        file.full_clean()
        file.save()

        return file
The implementation of file_generate_name is the same as above.
And with that, we've achieved our goal:
- Direct file upload for our APIs, that works with both S3 & local.
- Django admin working just as usual.
Best of both worlds!
What's next?
The example provided in this blog post is minimal. We can extend it & bend it to our needs.
One can:
- Add checks for file size. We can even allow different file sizes, depending on the way we upload the file.
- Add custom CDN for files, using CloudFront.
- Move static files to S3 & serve them via CloudFront too.
- Expand the Django Admin to support the "direct" flow.
It's up to you to take it from here.
Resources
Here's a list of resources that were used in constructing this blog post:
- https://github.com/HackSoftware/Django-Styleguide
- https://github.com/HackSoftware/Django-Styleguide-Example
- https://github.com/HackSoftware/Example-React-Project
- https://docs.djangoproject.com/en/4.0/topics/files/
- https://devcenter.heroku.com/articles/s3-upload-python
- https://boto3.amazonaws.com/v1/documentation/api/latest/reference/services/s3.html#S3.Client.generate_presigned_post
- https://django-storages.readthedocs.io/en/latest/backends/amazon-S3.html
- https://docs.aws.amazon.com/AmazonS3/latest/API/sigv4-HTTPPOSTConstructPolicy.html