
Need help with your Django project?
Check our django servicesAdding required two-factor authentication (2FA) to the Django admin

The code from this article, as a running example, can be found in our Django Styleguide Example. Nevertheless, we highly recommend reading the article first, in order to better navigate the code examples.
The Django admin panel serves as a powerful tool for managing and controlling your web application's backend.
However, the admin panel's accessibility also poses a potential security risk, as unauthorized access could lead to unauthorized modifications and other malicious activities.
By default, the Django admin panel can be accessed by staff and superuser users, and is hidden behind a standard login form, which requires only a username and a password.
A good additional security measure that comes out of the box is the ability to assign groups and permissions to users, however it won't be enough if the user's device or login credentials are stolen.
In order to mitigate these risks and reduce the likelihood of unauthorized access, we'll guide you through the process of adding an additional layer of security - required 2-factor authentication for all admin logins.
Before we begin with the implementation steps, we suggest you explore the capabilities of django-otp and django-two-factor-auth to see if they suit your needs.
For brevity, we are going to use 2FA, as the short form of two-factor authentication.
What are the usual components of a 2FA flow?
A typical two-factor authentication flow consists of the following components:
- A way for users to opt into 2FA authentication for their account. This allows the staff members to flexibly setup their 2FA method without the need to contact a developer or superuser for additional account management.
- A one-time password (OTP) delivery method - The users will need to provide a OTP every time they attempt to log into the admin panel. The most common methods of providing a OTP to users is via SMS, Email or an authenticator app, such as Authy or Google Authenticator.
- Standard user authentication - We need a way to obtain the user's credentials in order to identify them before prompting them for a OTP.
- OTP Verification - After we've identified the user by their credentials we'll require the user to enter the OTP they've obtained from one of the delivery methods above. We'll also need to handle OTP rejection / successful verification appropriately, either by denying or granting the user access to the admin panel.
- User authorization - After a user has set up a 2FA method, we need to ensure that they have signed in using a valid OTP on each attempt they make to perform an action in the admin panel.
In this article, we'll be using an authenticator app as a delivery method for one-time passwords, since it does not require the integration of other messaging services and is easy to use for most users.
What is a OTP (one-time password)?
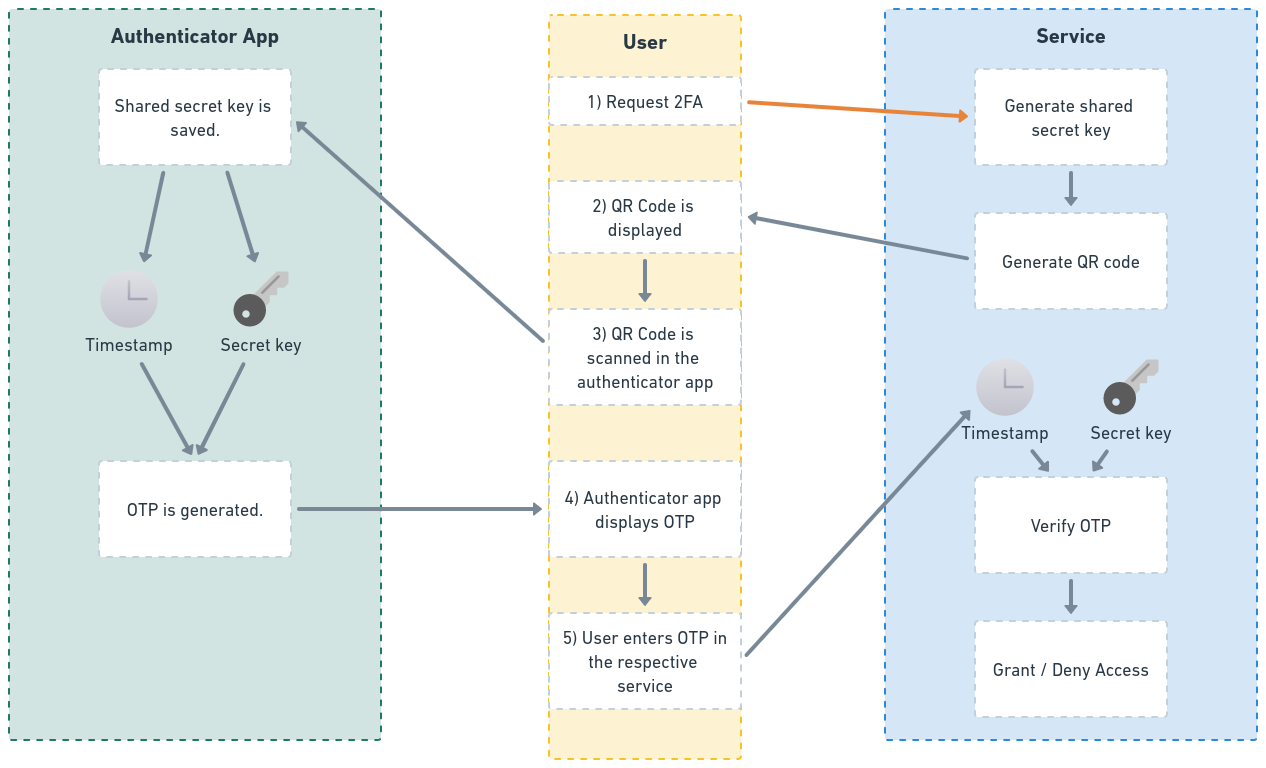
When a user enables 2FA for a service, they usually scan a QR code, provided by that service, using an authenticator app like Google Authenticator.
This QR code contains a shared secret key, which is generated by the service and is stored both in the service, and the authenticator app.
Once the secret key is stored by the authenticator app, the user will notice the app starts generating tokens, which are rotated every fewseconds.
These tokens are called one-time passwords, and they are generated with the help of time-based algorithm, using the current timestamp and the shared secret key.
On the other hand, when the users enters the OTP, the services also uses the current timestamp and the shared secret key, in order to validate it.
Here's a simple visualization of the process.
Follow the flow, starting from the orange arrow:
Now that we've explained the bigger picture, lets move onto the actual implementation in our Django project.
Implementing 2FA Authentication in the Django admin
Let's start implementing our two-factor authentication flow steps:
1. Adding a way for admins to opt into 2FA authentication
In order to add our service to an authenticator app, our users will need access to an additional view, which:
- Generates a shared secret key.
- Stores the secret key for OTP verification in the future.
- Displays a QR code for the user to scan with their authenticator app.
First, we'll need to create a simple model for storing each user's secret key:
from django.db import models
from django.conf import settings


class UserTwoFactorAuthData(models.Model):
    user = models.OneToOneField(
        settings.AUTH_USER_MODEL,
        related_name='two_factor_auth_data',
        on_delete=models.CASCADE
    )

    otp_secret = models.CharField(max_length=255)
Our next step is to create a service for generating and storing the secret key.
For generating the secret key and validating one-time passwords, we'll be using the pyotp package.
from django.core.exceptions import ValidationError

import pyotp

from .models import UserTwoFactorAuthData


def user_two_factor_auth_data_create(*, user) -> UserTwoFactorAuthData:
    if hasattr(user, 'two_factor_auth_data'):
        raise ValidationError(
            'Can not have more than one 2FA related data.'
        )

    two_factor_auth_data = UserTwoFactorAuthData.objects.create(
        user=user,
        otp_secret=pyotp.random_base32()
    )

    return two_factor_auth_data
Having the secret key ready, we can use it to generate a QR code using python-qrcode.
For simplicity, we are going to add a new method to our model, which will output the QR code as an <svg> HTML tag:
from typing import Optional

from django.db import models
from django.conf import settings

import pyotp
import qrcode
import qrcode.image.svg


class UserTwoFactorAuthData(models.Model):
    user = models.OneToOneField(
        settings.AUTH_USER_MODEL,
        related_name='two_factor_auth_data',
        on_delete=models.CASCADE
    )

    otp_secret = models.CharField(max_length=255)

    def generate_qr_code(self, name: Optional[str] = None) -> str:
        totp = pyotp.TOTP(self.otp_secret)
        qr_uri = totp.provisioning_uri(
            name=name,
            issuer_name='Styleguide Example Admin 2FA Demo'
        )

        image_factory = qrcode.image.svg.SvgPathImage
        qr_code_image = qrcode.make(
            qr_uri,
            image_factory=image_factory
        )

        # The result is going to be an HTML <svg> tag
        return qr_code_image.to_string().decode('utf_8')
Now that our components are ready, let's combine them into a view, where our admins can enable two-factor authentication.
We'll create a standard Django TemplateView, which will show the setup form for our 2FA:
from django.core.exceptions import ValidationError
from django.views.generic import TemplateView
from .services import user_two_factor_auth_data_create
class AdminSetupTwoFactorAuthView(TemplateView):
template_name = "admin_2fa/setup_2fa.html"
def post(self, request):
context = {}
user = request.user
try:
two_factor_auth_data = user_two_factor_auth_data_create(user=user)
otp_secret = two_factor_auth_data.otp_secret
context["otp_secret"] = otp_secret
context["qr_code"] = two_factor_auth_data.generate_qr_code(
name=user.email
)
except ValidationError as exc:
context["form_errors"] = exc.messages
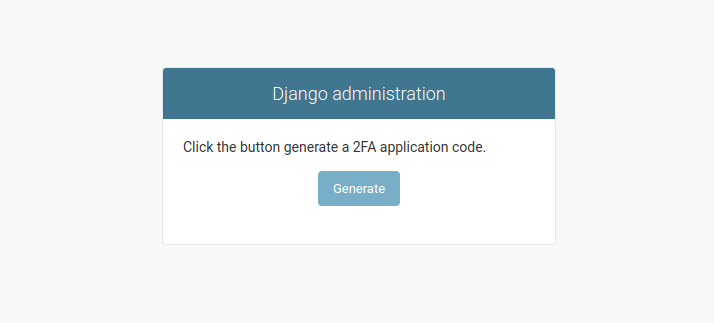
return self.render_to_response(context)For the setup_2fa.html template, we'll inherit the Django admin's login.html and add a simple form:
{% extends "admin/login.html" %}

{% block content %}
  <form action="" method="post">
    {% csrf_token %}

    {% if otp_secret %}
      <p><strong>OTP Secret:</strong></p>
      <p>{{ otp_secret }}</p>
      <p>Enter it inside a 2FA app (Google Authenticator, Authy) or scan the QR code below.</p>
      {{ qr_code|safe }}
    {% else %}
      {% if form_errors %}
	{% for error in form_errors %}
	  <p class="errornote">
	    {{ error }}
	  </p>
	{% endfor %}
      {% else %}
	<label>Click the button generate a 2FA application code.</label>
      {% endif %}
    {% endif %}

    <div class="submit-row">
      <input type="submit" value="Generate">
    </div>
  </form>
{% endblock %}
Now, what we want to achieve next, is to expose this particular view from the Django admin.
In order to do this, we will do the following steps:
- Create a custom Admin Site
- Extend the Admin Site's urls with our own.
- Add a link to our new view in the admin panel.
We want to achieve the following results:
What we recommend here, is to create a new Django app, called custom_admin, which will hold everything relevant to the admin overriding that we are going to do.
In the custom_admin app, we'll create a sites.py file with our custom Admin Site, containing a url to the new view:
from django.contrib import admin
from django.urls import path

from styleguide_example.blog_examples.admin_2fa.views import AdminSetupTwoFactorAuthView


class AdminSite(admin.AdminSite):
    def get_urls(self):
        base_urlpatterns = super().get_urls()

        extra_urlpatterns = [
            path("setup-2fa/", self.admin_view(AdminSetupTwoFactorAuthView.as_view()), name="setup-2fa")
        ]

        return extra_urlpatterns + base_urlpatterns
We'll add a link to the url in the top right corner of the admin panel by overriding the Django admin's base_site template.
Create a base_site.html template inside the {BASE_DIR}/templates/admin/ directory:
{% extends "admin/base_site.html" %}

{% block userlinks %}
  {% if user.is_active and user.is_staff %}
    <a href="{% url "admin:setup-2fa" %}"> Setup 2FA </a> /
  {% endif %}

  {{ block.super }}
{% endblock %}
Important note: This particular template has nothing to do with thecustom_adminapp that we just created. Rather, this template is the way to extend the existing Django admin template and add something in theuserlinkssection. In order for this to work, you need to properly configure yourTEMPLATES, especially theDIRSkey, to look for wherever your{BASE_DIR}is. You can read more here - https://docs.djangoproject.com/en/4.2/howto/overriding-templates/
And finally, in order for all of this to work, we need to replace the default Django admin with our own.
We can do this by:
First, declaring our admin site in our custom_admin app config:
from django.contrib.admin.apps import AdminConfig as BaseAdminConfig


class CustomAdminConfig(BaseAdminConfig):
default_site = "styleguide_example.custom_admin.sites.AdminSite"Second, swapping the django.contrib.admin app in INSTALLED_APPS with our own admin app config.
INSTALLED_APPS = [
    # "django.contrib.admin",
    "styleguide_example.custom_admin.apps.CustomAdminConfig",
    ...
]
This concludes the first step of our 2FA flow:
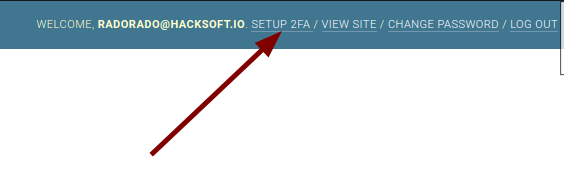
- We now have a
SETUP 2FAlink in the top right corner of the admin panel that leads to our view. - Our users can generate a secret key and scan a QR code with their authenticator app to begin receiving one-time passwords for signing in the admin panel.
Let's move on to the next one.
2. Standard user authentication
The Django admin already has out of the box user authentication with a username and a password.
However, if a user has set up two factor authentication, they need to go through an additional step of verifying their one-time password.
And if they haven't, we need to make sure they configure it.
Since we already have a custom Django admin site in place, we can explicitly define that by overriding the site's login method:
from django.urls import path, reverse
from django.contrib import admin
from django.contrib.auth import REDIRECT_FIELD_NAME

from styleguide_example.blog_examples.admin_2fa.views import AdminSetupTwoFactorAuthView
from styleguide_example.blog_examples.admin_2fa.models import UserTwoFactorAuthData


class AdminSite(admin.AdminSite):
    def get_urls(self):
        base_urlpatterns = super().get_urls()

        extra_urlpatterns = [
            path(
            	"setup-2fa/",
                self.admin_view(AdminSetupTwoFactorAuthView.as_view()),
                name="setup-2fa"
            )
        ]

        return extra_urlpatterns + base_urlpatterns

    def login(self, request, *args, **kwargs):
        if request.method != 'POST':
            return super().login(request, *args, **kwargs)

        username = request.POST.get('username')

		# How you query the user depending on the username is up to you
        two_factor_auth_data = UserTwoFactorAuthData.objects.filter(
            user__email=username
        ).first()

        request.POST._mutable = True
        request.POST[REDIRECT_FIELD_NAME] = reverse('admin:confirm-2fa')

        if two_factor_auth_data is None:
            request.POST[REDIRECT_FIELD_NAME] = reverse("admin:setup-2fa")

        request.POST._mutable = False

        return super().login(request, *args, **kwargs)
With this implementation, we are effectively enforcing 2FA for all users who are going to login to the Django admin.
3. OTP Verification
We're now redirecting our users to a view that requires them to enter a OTP obtained from an authenticator app.
This view needs to accept the one time password from a form and validate it using the timestamp and the secret key.
In order to achieve that, we need to do 3 things:
- Create a new Django view, that'll handle the verification.
- Add a template for the view.
- Add the view to the Django admin as
admin:confirm-2fa
First, let's give our UserTwoFactorAuthData model a way to validate OTPs using the secret key stored in it:
from typing import Optional

import pyotp
import qrcode
import qrcode.image.svg
from django.conf import settings
from django.db import models


class UserTwoFactorAuthData(models.Model):
    user = models.OneToOneField(
    	settings.AUTH_USER_MODEL,
        related_name="two_factor_auth_data", on_delete=models.CASCADE
    )

    otp_secret = models.CharField(max_length=255)

    def generate_qr_code(self, name: Optional[str] = None) -> str:
        ...

    def validate_otp(self, otp: str) -> bool:
        totp = pyotp.TOTP(self.otp_secret)

        return totp.verify(otp)
Now we can use that validation in a view that accepts the one-time password from the user:
from django import forms
from django.urls import reverse_lazy
from django.views.generic import TemplateView, FormView
from django.core.exceptions import ValidationError

from .services import user_two_factor_auth_data_create
from .models import UserTwoFactorAuthData


class AdminSetupTwoFactorAuthView(TemplateView):
	...


class AdminConfirmTwoFactorAuthView(FormView):
    template_name = "admin_2fa/confirm_2fa.html"
    success_url = reverse_lazy("admin:index")

    class Form(forms.Form):
        otp = forms.CharField(required=True)

        def clean_otp(self):
            self.two_factor_auth_data = UserTwoFactorAuthData.objects.filter(
                user=self.user
            ).first()

            if self.two_factor_auth_data is None:
                raise ValidationError('2FA not set up.')

            otp = self.cleaned_data.get('otp')

            if not self.two_factor_auth_data.validate_otp(otp):
                raise ValidationError('Invalid 2FA code.')

            return otp

    def get_form_class(self):
        return self.Form

    def get_form(self, *args, **kwargs):
        form = super().get_form(*args, **kwargs)

        form.user = self.request.user

        return form

    def form_valid(self, form):
        return super().form_valid(form)
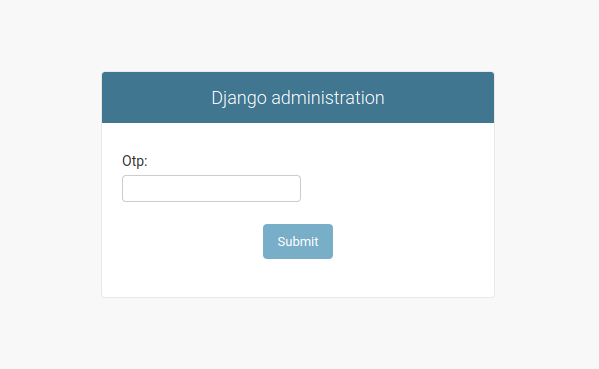
Respectively, the confirm_2fa.html template is going to look like that:
{% extends "admin/login.html" %}

{% block content %}
  {% if form.non_field_errors %}
    {% for error in form.non_field_errors %}
      <p class="errornote">
	{{ error }}
      </p>
    {% endfor %}
  {% endif %}

  <form action="" method="post">
    {% csrf_token %}

    <div class="form-row">
      {{ form.otp.errors }}
      {{ form.otp.label_tag }} {{ form.otp }}
    </div>

    <div class="submit-row">
      <input type="submit" value="Submit">
    </div>
  </form>
{% endblock %}
And finally, we need to link our view with a Django admin url:
class AdminSite(admin.AdminSite):
    def get_urls(self):
        base_urlpatterns = super().get_urls()

        extra_urlpatterns = [
            path(
                "setup-2fa/",
                self.admin_view(AdminSetupTwoFactorAuthView.as_view()),
                name="setup-2fa"
            ),
            path(
                "confirm-2fa/",
                self.admin_view(AdminConfirmTwoFactorAuthView.as_view()),
                name="confirm-2fa"
            )
        ]

        return extra_urlpatterns + base_urlpatterns

        ....
That's it!
We can now test what we have so far. If you don't have an authenticator app at hand, you can use this Google Chrome extension, which will do the trick.
- Do the 2FA setup.
- Try logging in, the extra OTP screen should be shown.
- Enter wrong OTP.
- Enter correct OTP.
4. What if our users already have a session?
So far, we've enforced our Django admin users to have two factor authentication setup & we are requiring OTP after each login.
But we have one more problem to solve:
Right now, our Django admin users have already obtained a session before completing the OTP validation step.
This means they can just skip it and start accessing the resources in the admin panel.
Imagine the following scenario:
- A staff member enters their username and password in the login form, which redirects them to the OTP verification step.
- The staff member reopens the admin panel. A valid session is already obtained when completing the login form, so they are not prompted to enter a OTP.
- They can now manage everything in the admin panel, even though they skipped the confirmation step.
There's also a high chance that alongside our Django admin, we have additional piece of software, that lets users login, but we don't want to enforce or deal with two-factor authentication there.
What can happen is the following:
- A user that has access to the Django admin can login & obtain a valid session.
- This user opens the Django admin => access granted, since the session is valid.
- And we've successfully skipped the extra OTP verification step.
This is a security risk, that we need to mitigate.
We're going to utilize Django's session capabilities to do just that:
- We're going to store a unique identifier for each user that has passed 2FA.
- Each time a user logs in using 2FA, we're going to rotate that identifier and store it in the session.
- We're going to validate on each request, that the identifier in the session is the correct for the current user.
To store the identifier for each user, we'll need to update our model:
from typing import Optional

import uuid

import pyotp
import qrcode
import qrcode.image.svg
from django.conf import settings
from django.db import models


class UserTwoFactorAuthData(models.Model):
    user = models.OneToOneField(
    	settings.AUTH_USER_MODEL,
        related_name="two_factor_auth_data",
        on_delete=models.CASCADE
    )

    otp_secret = models.CharField(max_length=255)
    session_identifier = models.UUIDField(blank=True, null=True)

    def generate_qr_code(self, name: Optional[str] = None) -> str:
		...

    def validate_otp(self, otp: str) -> bool:
		...

    def rotate_session_identifier(self):
        self.session_identifier = uuid.uuid4()

        self.save(update_fields=["session_identifier"])
Now, let's rotate that identifier and add it to the user's session after a successful log in:
from django import forms
from django.urls import reverse_lazy
from django.views.generic import TemplateView, FormView
from django.core.exceptions import ValidationError

from .services import user_two_factor_auth_data_create
from .models import UserTwoFactorAuthData


class AdminSetupTwoFactorAuthView(TemplateView):
	...


class AdminConfirmTwoFactorAuthView(FormView):
    template_name = "admin_2fa/confirm_2fa.html"
    success_url = reverse_lazy("admin:index")

    class Form(forms.Form):
        otp = forms.CharField(required=True)

        def clean_otp(self):
            self.two_factor_auth_data = UserTwoFactorAuthData.objects.filter(
                user=self.user
            ).first()

            if self.two_factor_auth_data is None:
                raise ValidationError('2FA not set up.')

            otp = self.cleaned_data.get('otp')

            if not self.two_factor_auth_data.validate_otp(otp):
                raise ValidationError('Invalid 2FA code.')

            return otp

    def get_form_class(self):
        return self.Form

    def get_form(self, *args, **kwargs):
        form = super().get_form(*args, **kwargs)

        form.user = self.request.user

        return form

    def form_valid(self, form):
        form.two_factor_auth_data.rotate_session_identifier()

        self.request.session['2fa_token'] = str(form.two_factor_auth_data.session_identifier)

        return super().form_valid(form)
Finally, we have to validate the session identifier on each request.
Again, having a custom admin site makes that easy for us, all we need to do is overwrite it's has_permission method:
class AdminSite(admin.AdminSite):
    def get_urls(self):
		...

    def login(self, request, *args, **kwargs):
    	...

    def has_permission(self, request):
        has_perm = super().has_permission(request)

        if not has_perm:
            return has_perm

        two_factor_auth_data = UserTwoFactorAuthData.objects.filter(
            user=request.user
        ).first()

        allowed_paths = [
            reverse("admin:confirm-2fa"),
            reverse("admin:setup-2fa")
        ]

        if request.path in allowed_paths:
            return True

        if two_factor_auth_data is not None:
            two_factor_auth_token = request.session.get("2fa_token")

            return str(two_factor_auth_data.session_identifier) == two_factor_auth_token

        return False
Security considerations
While 2FA adds an extra layer of security on top of user authentication, it's important to consider the security aspects of the 2FA implementation itself.
For example, any exposure of the shared secret key means that it is compromised and can be exploited for unauthorized access.
Based on your needs, consider adding the following security measures to your 2FA implementation:
- Do not expose the
UserTwoFactorAuthDatamodel in the Django admin, since the secret key is stored there. This means that in order to additionally manage things, you'll need shell access or you can use custom management commands. - Encrypt the secret key field, instead of storing it as plain text. For example, you can use either Python's cryptography
Fernetmodule, ordjango-cryptography, in order to achieve that. - Protect against brute-force attacks, by rate-limiting the amout of OTP verification attempts. Additionally, you can throw a form of a CAPTCHA challange, in the mix.
With this, 2FA implementation is ready. We've now added an additional security layer to our Django admin panel.
For a full implementation, you can check our Django Styleguide Example.