
Need help with your Django project?
Check our django services
⚠️ Heads up ⚠️ This article is now outdated.
We've written a new version of this article, that you can find here - Adding Google login to your existing Django and Django Rest Framework applications
We decided to write this blog post for a single reason - give you a practical example of how to implement an OAuth2 flow on your own. There are 2 different flows that you can take - client-side & server-side. They look similar in the first place but they have some fundamental differences.
In this and in our next article, we will go through the full implementation of both of the flows, explaining the differences between them and highlighting the important points. After all, we hope that having the code in place will be helpful to all of you 🙌.
TL;DR
In this blog post, we'll show you the Client-side Google OAuth2 flow.
All of the code examples and the full implementation from this article are placed in this GitHub repository. It's deployed here so you can give it a try before diving into the blog post.
If you've found this useful, don't forget to give us a ⭐.
Prerequisites
We won't go into details about the OAuth2 flow itself. There are a lot of good articles on the topic so check them out if you want to understand the flow better. We recommend checking this one from Google.
You'll need to set up your own Google Account and OAuth2 application. Follow these steps if you don't have one already.
We use Django REST Framework (DRF) for our APIs and React in the front-end. We assume that you're familiar with them.
The Django code follows our Django Styleguide. You can check it here if you've found it useful ✌️
Before we start: OAuth2
Logging users in using OAuth2 is a common thing for most websites nowadays. We cannot think of a platform that we've used recently where we couldn't log in using a Google account. That's why we decided to use the Google OAuth2 provider for our examples.
The OAuth2 flow is a common "algorithm". Even if you don't use the Google OAuth2 provider, this article can be a nice reference that might help you 👍.
Client-side OAuth2
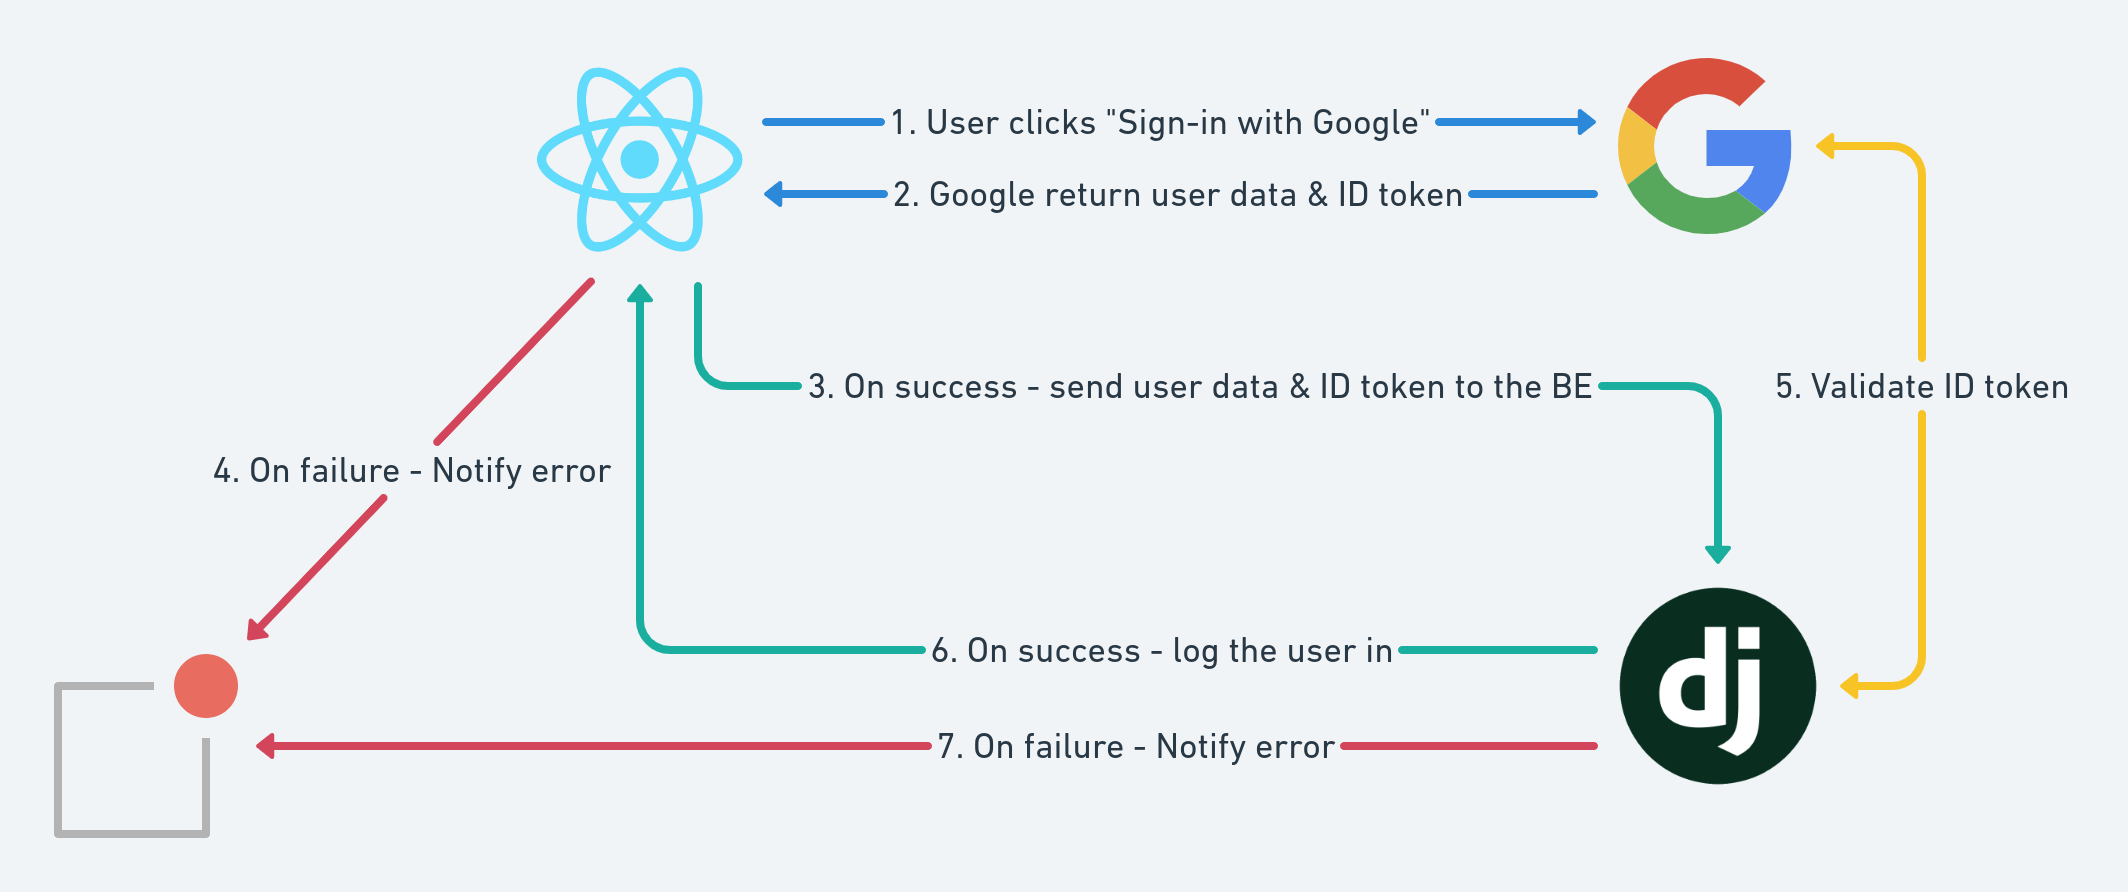
Our initial approach to this requirement was to take the client-side OAuth2 route:
- You should open a Google window/iframe using Javascript in your front-end.
- Your users can authenticate using the Google OAuth2 form. This will return you an id token.
- If everything is OK, send that id token to your back-end.
- The back-end validates this id token with Google and if everything is OK, it creates a new session for your user.
Here is a simple diagram that illustrates these steps:
There are a couple of good React implementations already. We've used react-google-login for this example.
Overall, all of these React implementations are just developer-friendly wrappers around Google's gapi. If you don't want to add more dependencies to your project, consider using the vanilla Google implementation instead. We're aiming for the same result after all.
Google Application Setup
Before setting up this flow, you'll need to configure your Google OAuth2 application properly. There's actually a single thing that you need to do and this is to set your front-end application URL(s) in the Authorized JavaScript origins in your Google application settings:
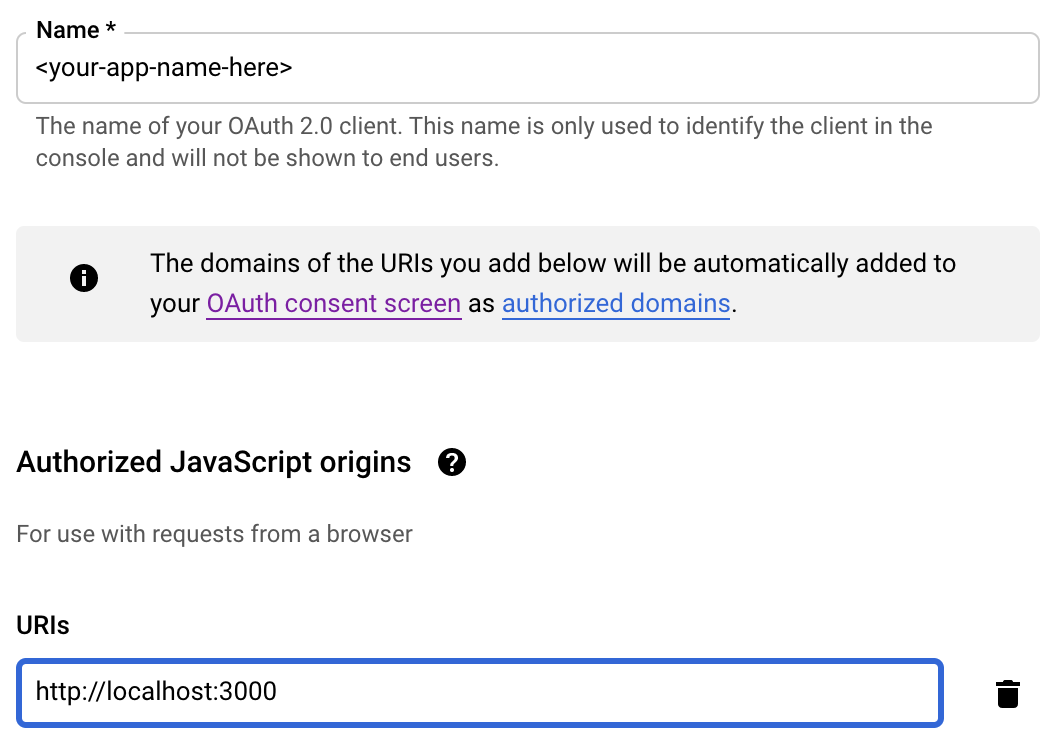
Note: For local React development, the default server port is 3000. Change this corresponding to your specific environment. If you decide to deploy your app, you just need to add another origin and set the live app URL.
Client-side flow in your React front-end
After you've installed the package in your React app, the only thing that you need to do is to use their main component in your Login page.
import React from 'react';
import { GoogleLogin } from 'react-google-login';

const Login = () => {
  return (
    <GoogleLogin
      clientId={process.env.REACT_APP_GOOGLE_CLIENT_ID}  // your Google app client ID
      buttonText="Sign in with Google"
      onSuccess={onGoogleLoginSuccess} // perform your user logic here
      onFailure={onGoogleLoginFailure} // handle errors here
    />
  );
};
Here is how our onSuccess method looks like:
const onGoogleLoginSuccess = useCallback(
  response => {
    const idToken = response.tokenId;
    const data = {
      email: response.profileObj.email,
      first_name: response.profileObj.givenName,
      last_name: response.profileObj.familyName
    };

    validateTokenAndObtainSession({ data, idToken })
      .then(handleUserInit)
      .catch(notifyError);
  },
  [handleUserInit]
);
You need to attach the tokenId parameter from the Google success response as an Authorization header to your back-end server request (validateTokenAndObtainSession). Here's how this looks like:
import { post } from 'utils/sdk';

export const validateTokenAndObtainSession = ({ data, idToken }) => {
  const headers = {
    Authorization: idToken,
    'Content-Type': 'application/json'
  };

  return post('users/init/', data, { headers });
};
Client-side flow in your DRF back-end
First of all, your API needs to be public since there is still no user session. Therefore, you'll need to validate the Authorization header, which contains the id_token from Google:
from rest_framework.views import APIView

from api.mixins import ApiErrorsMixin, PublicApiMixin

from auth.services import google_validate_id_token


class UserInitApi(PublicApiMixin, ApiErrorsMixin, APIView):
    ...

    def post(self, request, *args, **kwargs):
        id_token = request.headers.get('Authorization')
        google_validate_id_token(id_token=id_token)

        ...
Then the back-end sends a request to the Google token info endpoint with id_token attached as a query parameter: https://oauth2.googleapis.com/tokeninfo?id_token=<id_token>
import requests

GOOGLE_ID_TOKEN_INFO_URL = 'https://www.googleapis.com/oauth2/v3/tokeninfo'


def google_validate_id_token(*, id_token: str) -> bool:
    response = requests.get(
        GOOGLE_ID_TOKEN_INFO_URL,
        params={'id_token': id_token}
    )

    ...
If the token is a valid Google JWT token -> Google will return an HTTP 200 OK response with the following structure:
{
    "iss": "https://accounts.google.com",
    "sub": "110169484474386276334",
    "azp": "1008719970978-hb24n2dstb40o45d4feuo2ukqmcc6381.apps.googleusercontent.com",
    "aud": "1008719970978-hb24n2dstb40o45d4feuo2ukqmcc6381.apps.googleusercontent.com",
    "iat": "1433978353",
    "exp": "1433981953"
}
The final step to authenticate this request is by comparing the aud (short for audience) from the Google response with the GOOGLE_OAUTH2_CLIENT_ID configured in your settings.py:
import requests

from django.conf import settings
from django.core.exceptions import ValidationError

GOOGLE_ID_TOKEN_INFO_URL = 'https://www.googleapis.com/oauth2/v3/tokeninfo'


def google_validate_id_token(*, id_token: str) -> bool:
    response = requests.get(
        GOOGLE_ID_TOKEN_INFO_URL,
        params={'id_token': id_token}
    )

    if not response.ok:
        raise ValidationError('id_token is invalid.')

    audience = response.json()['aud']

    if audience != settings.GOOGLE_OAUTH2_CLIENT_ID:
        raise ValidationError('Invalid audience.')

    return True
The next thing you should do here is to create a session for your users in the back-end. We use JSON Web Tokens for this purpose. Here is an example implementation that we use to set the JWT cookie data to the response:
from django.http import HttpResponse

from rest_framework_jwt.settings import api_settings
from rest_framework_jwt.compat import set_cookie_with_token

from users.models import User
from users.services import user_record_login


def jwt_login(*, response: HttpResponse, user: User) -> HttpResponse:
    jwt_payload_handler = api_settings.JWT_PAYLOAD_HANDLER
    jwt_encode_handler = api_settings.JWT_ENCODE_HANDLER

    payload = jwt_payload_handler(user)
    token = jwt_encode_handler(payload)

    if api_settings.JWT_AUTH_COOKIE:
        set_cookie_with_token(response, api_settings.JWT_AUTH_COOKIE, token)

    user_record_login(user=user)

    return response
And here's the exact usage in the API:
from rest_framework import serializers
from rest_framework.views import APIView
from rest_framework.response import Response

from api.mixins import ApiErrorsMixin, PublicApiMixin

from auth.services import jwt_login, google_validate_id_token

from users.selectors import user_get_me
from users.services import user_get_or_create


class UserInitApi(PublicApiMixin, ApiErrorsMixin, APIView):
    class InputSerializer(serializers.Serializer):
        email = serializers.EmailField()
        first_name = serializers.CharField(required=False, default='')
        last_name = serializers.CharField(required=False, default='')

    def post(self, request, *args, **kwargs):
        id_token = request.headers.get('id_token')
        google_validate_id_token(id_token=id_token)

        serializer = self.InputSerializer(data=request.data)
        serializer.is_valid(raise_exception=True)

        # We use get-or-create logic here for the sake of the example.
        # We don't have a sign-up flow.
        user, _ = user_get_or_create(**serializer.validated_data)

        response = Response(data=user_get_me(user=user))
        response = jwt_login(response=response, user=user)

        return response
The full implementation can be found here.
Voilà! You now have an OAuth2 login flow with just a few steps 🎉️.
Downsides
This was actually our proof-of-concept to the Google Login requirement. It was really nice to have it working with just a few lines of code!
The main issue with this approach is that you cannot access the Google APIs once the user leaves your application.
You may want to perform some background actions on behalf of the user. For example - sync Google Drive files on a daily basis at midnight. You want to perform this sync even if the user is not currently using your application.
This can be accomplished only if you have this flow implemented on a server.
From the Google docs:
This OAuth 2.0 flow is called the implicit grant flow. It is designed for applications that access APIs only while the user is present at the application. These applications are not able to store confidential information.
Another problem is that the Google iframe uses some "special" cookies to show you your Google accounts from which you can choose. In other words, you can't log in to our system if you've disabled third-party cookies in your browser. These problems are deeply discussed in this open Google JavaScript API issue in GitHub:
The other way to accomplish OAuth2 authorization flow with Google is by implementing it on your back-end rather than in your front-end. It also comes with some additional goodies 🍬.
We're going to show you how to do this in our next blog post. Stay tuned for more 🤠 !